The ultimate FAQ and "good to know" list for Cookie Consent.

Watch Tutorial

Our Cookie Consent solution is designed to help with GDPR compliance related to user consent for cookies and website tracking. However, full GDPR compliance involves more than just cookies, such as server locations and data processing, which are beyond our scope. This tool does not provide legal services. For specific compliance needs, please consult a lawyer.

About Components and styles

Do not remove the Attributes. They are required to make the Cookie Consent solution work.

Do not remove the attributes added to generated elements. If they are removed, the Solution will stop working.

Do not move the elements outside the fs-consent_component wrapper.
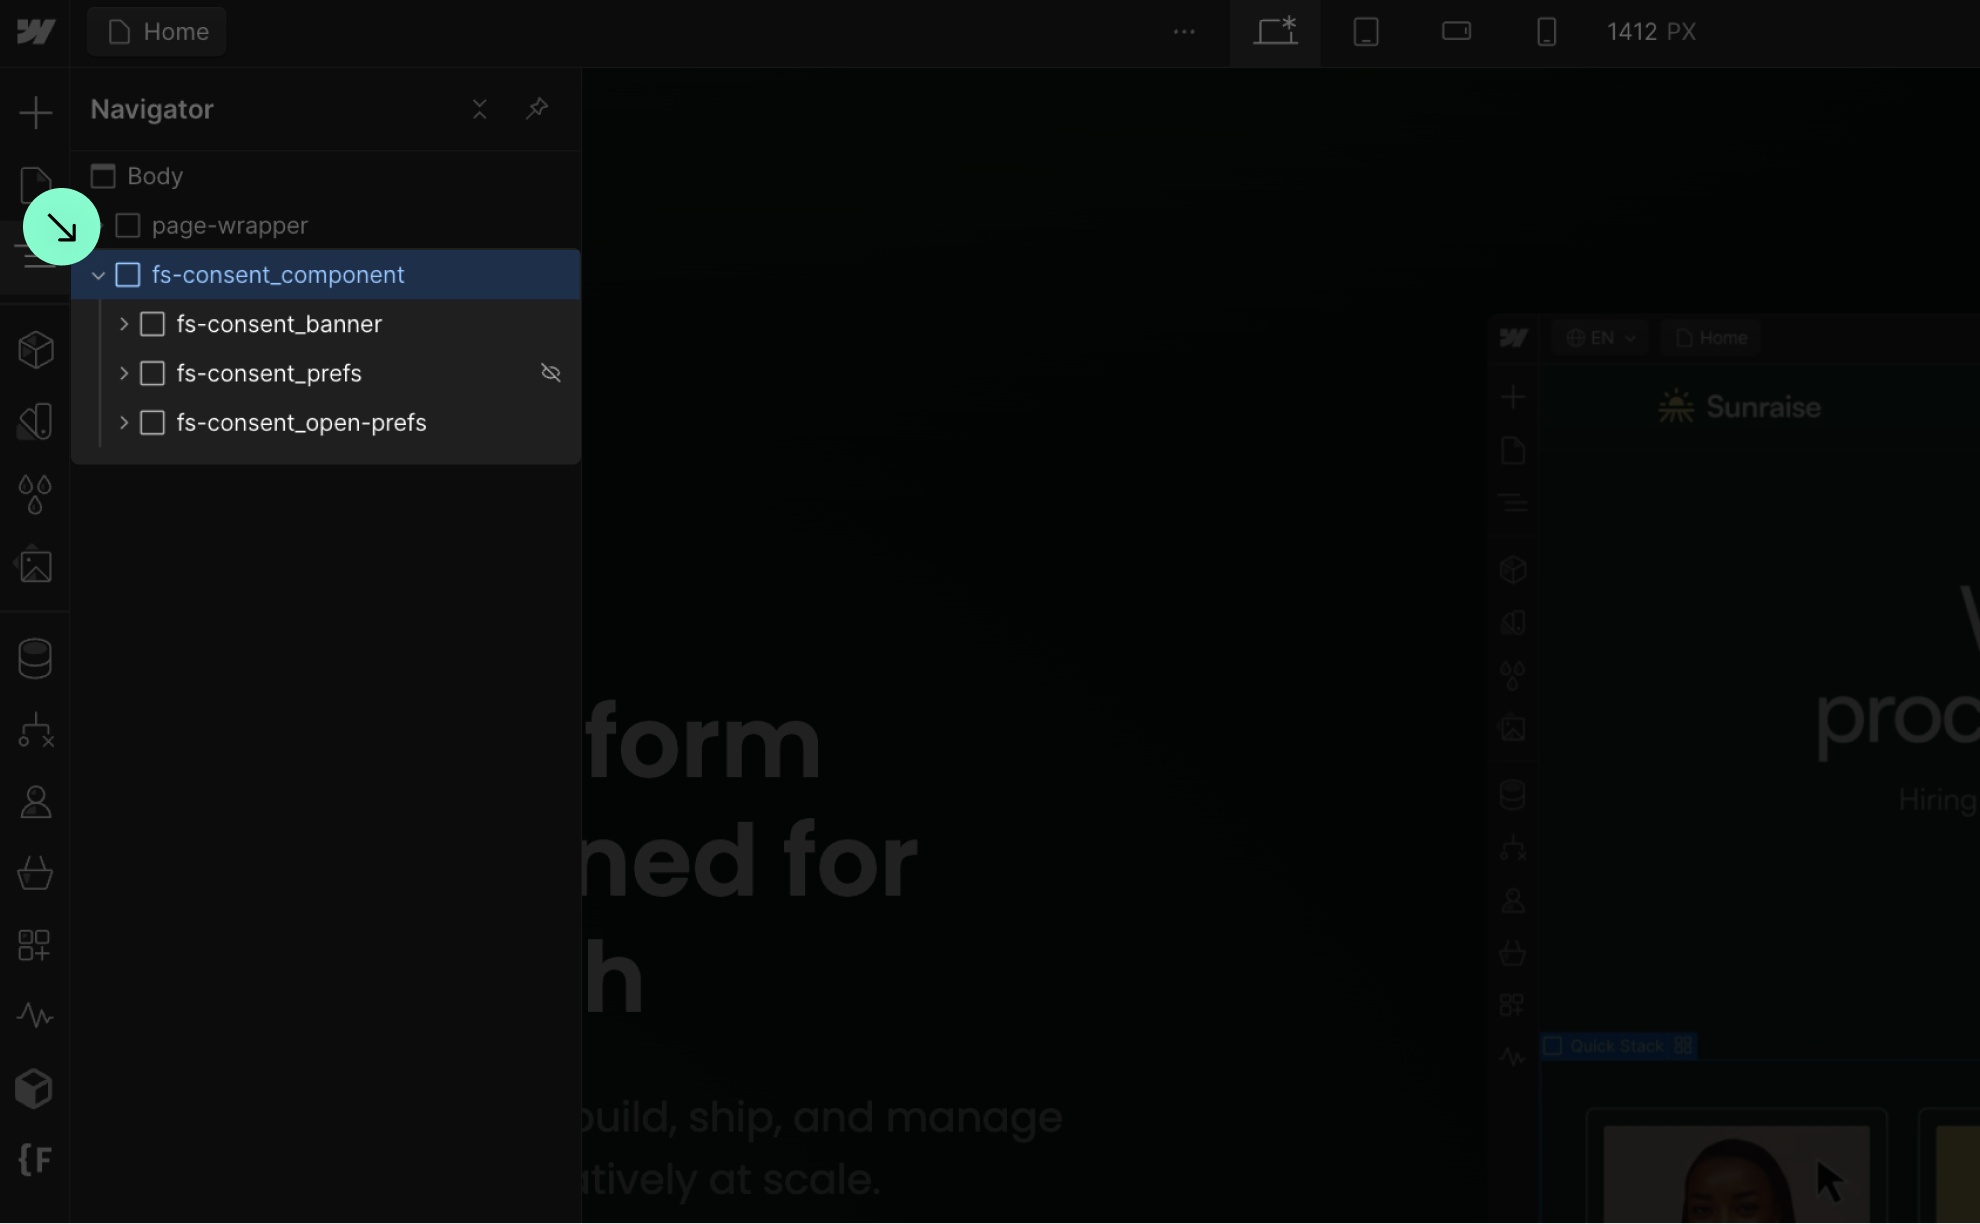
To keep the app functionality and edit mode working, keep all elements of the Cookie Consent component inside the fs-consent_component element that wraps all Cookie Consent elements.

Do not export the code and host the website on an external server.
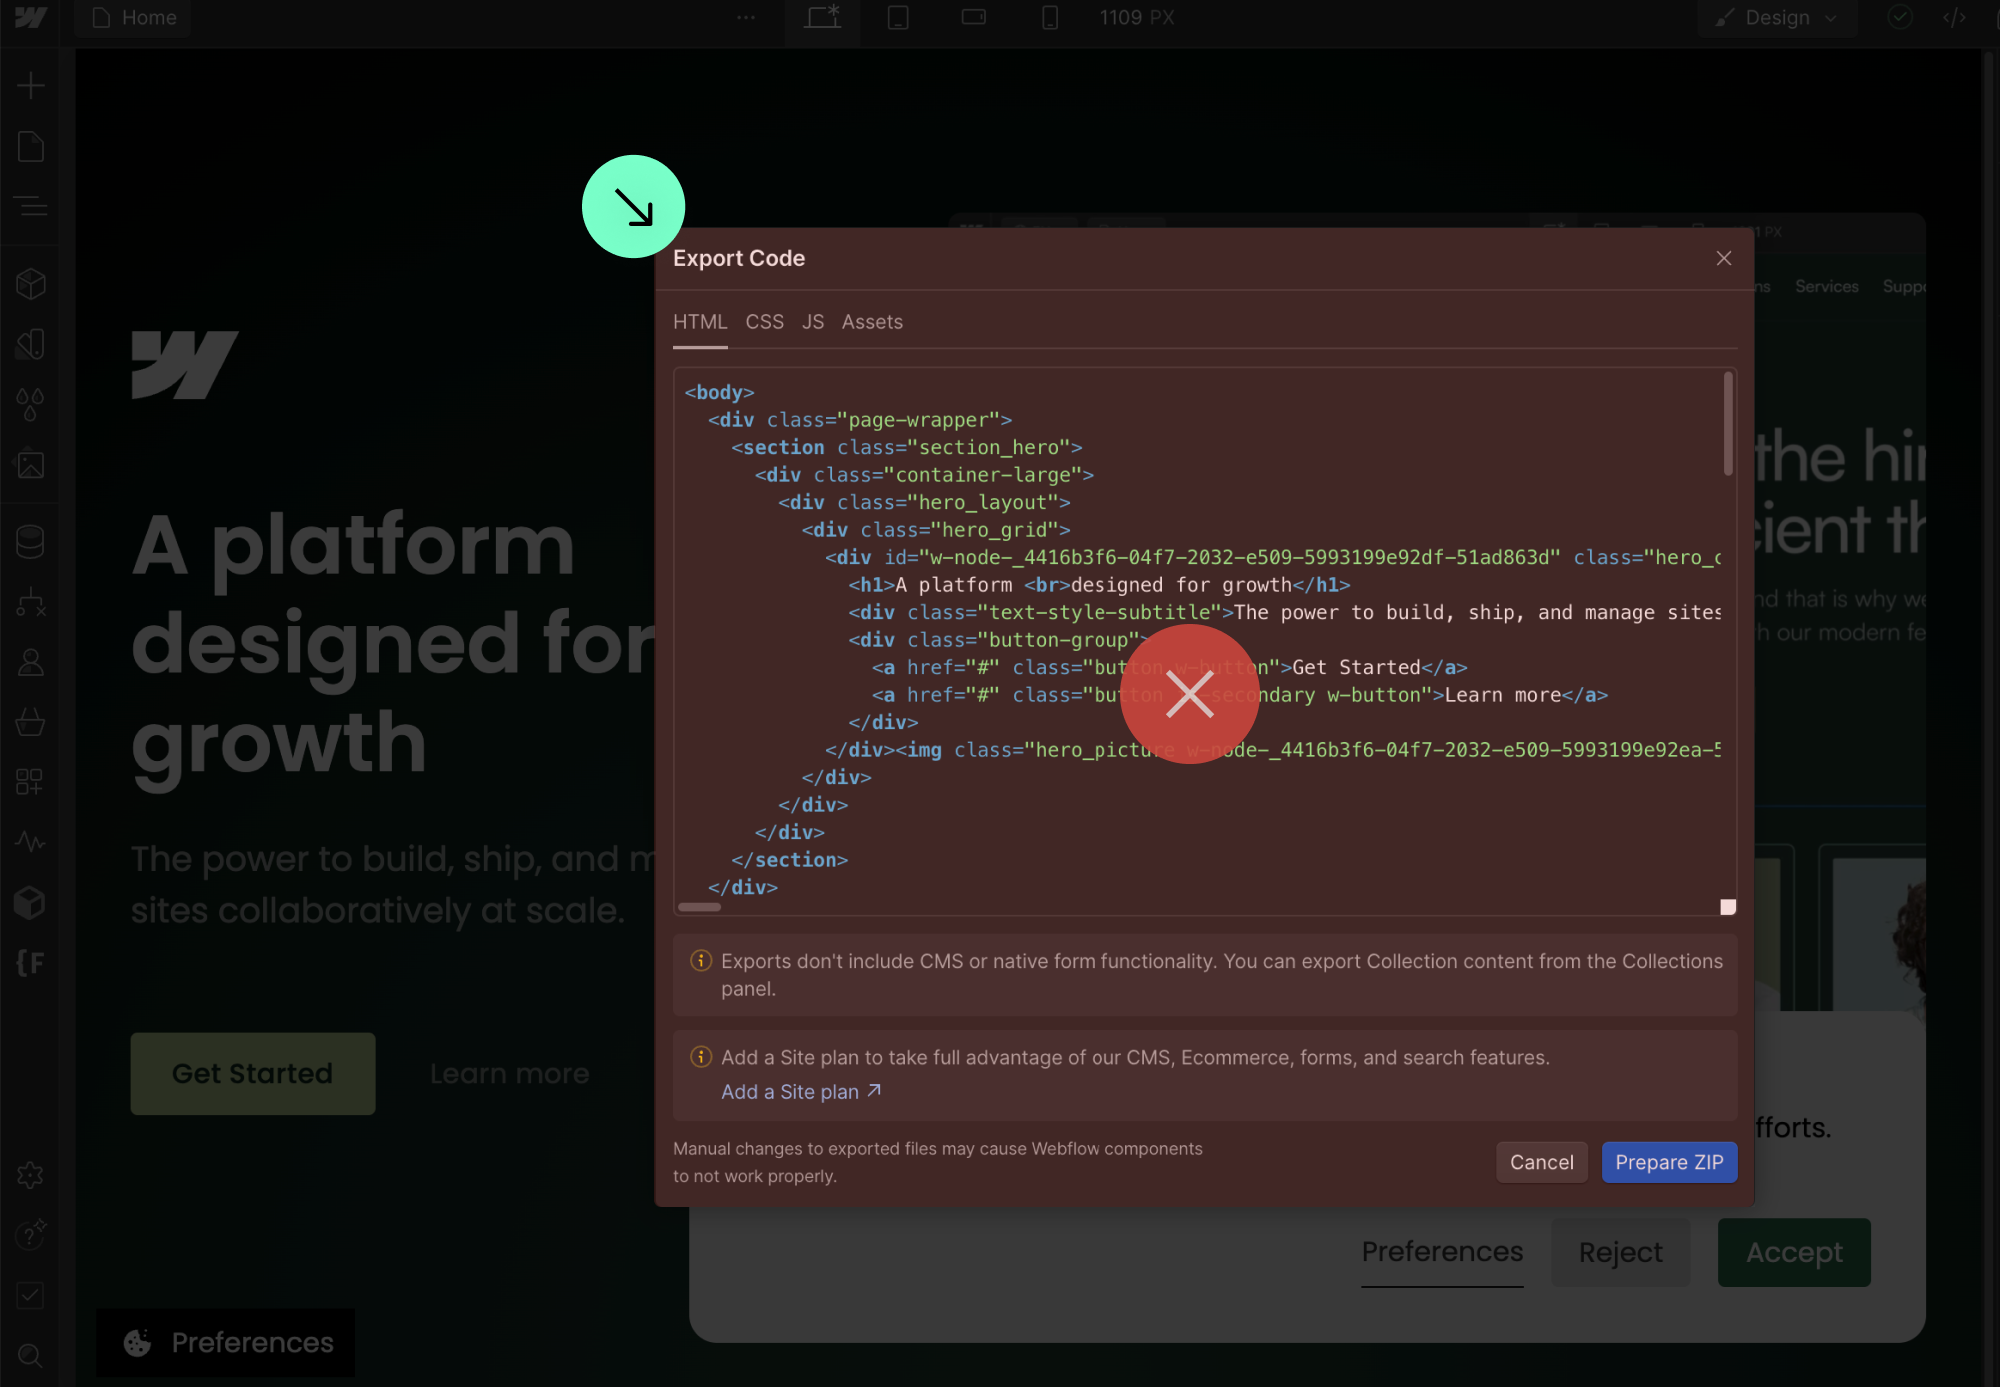
Currently, Webflow still doesn't allow us to export the website code with the script generated by our app needed to make the components work. In this case, if you export the code from Webflow and host your website on your own server, Finsweet Components will not function.

You can style and customize the Cookie Consent Component however you want.

Use the Webflow style panel to customize your Cookie Consent elements however you want. Use the Webflow Style panel just like any element inside Webflow.

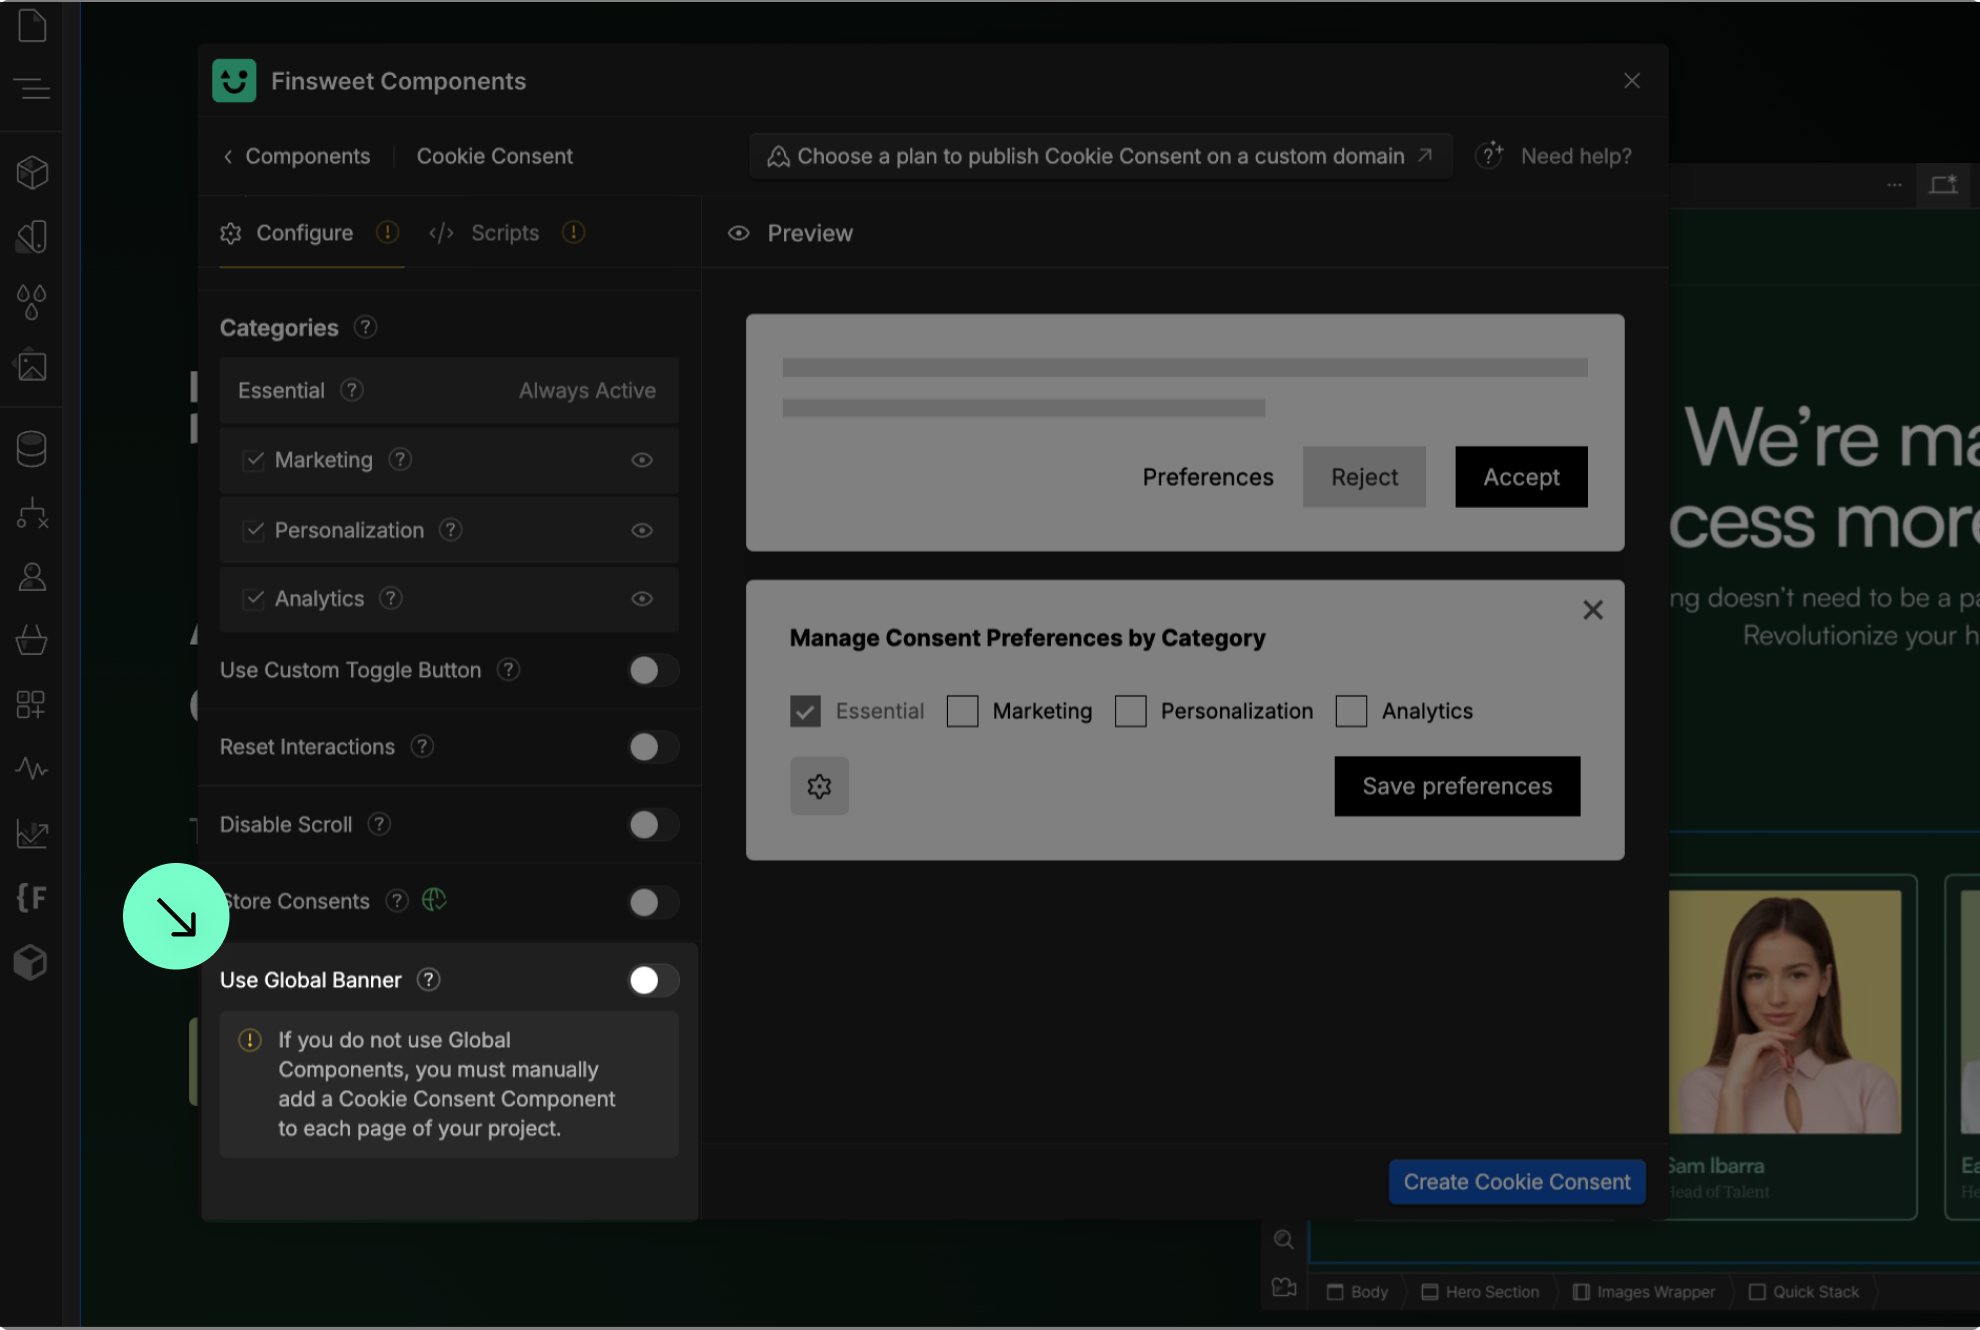
Use the Global Banner option if you want to have one Cookie Consent Component in your project and load it on every page.
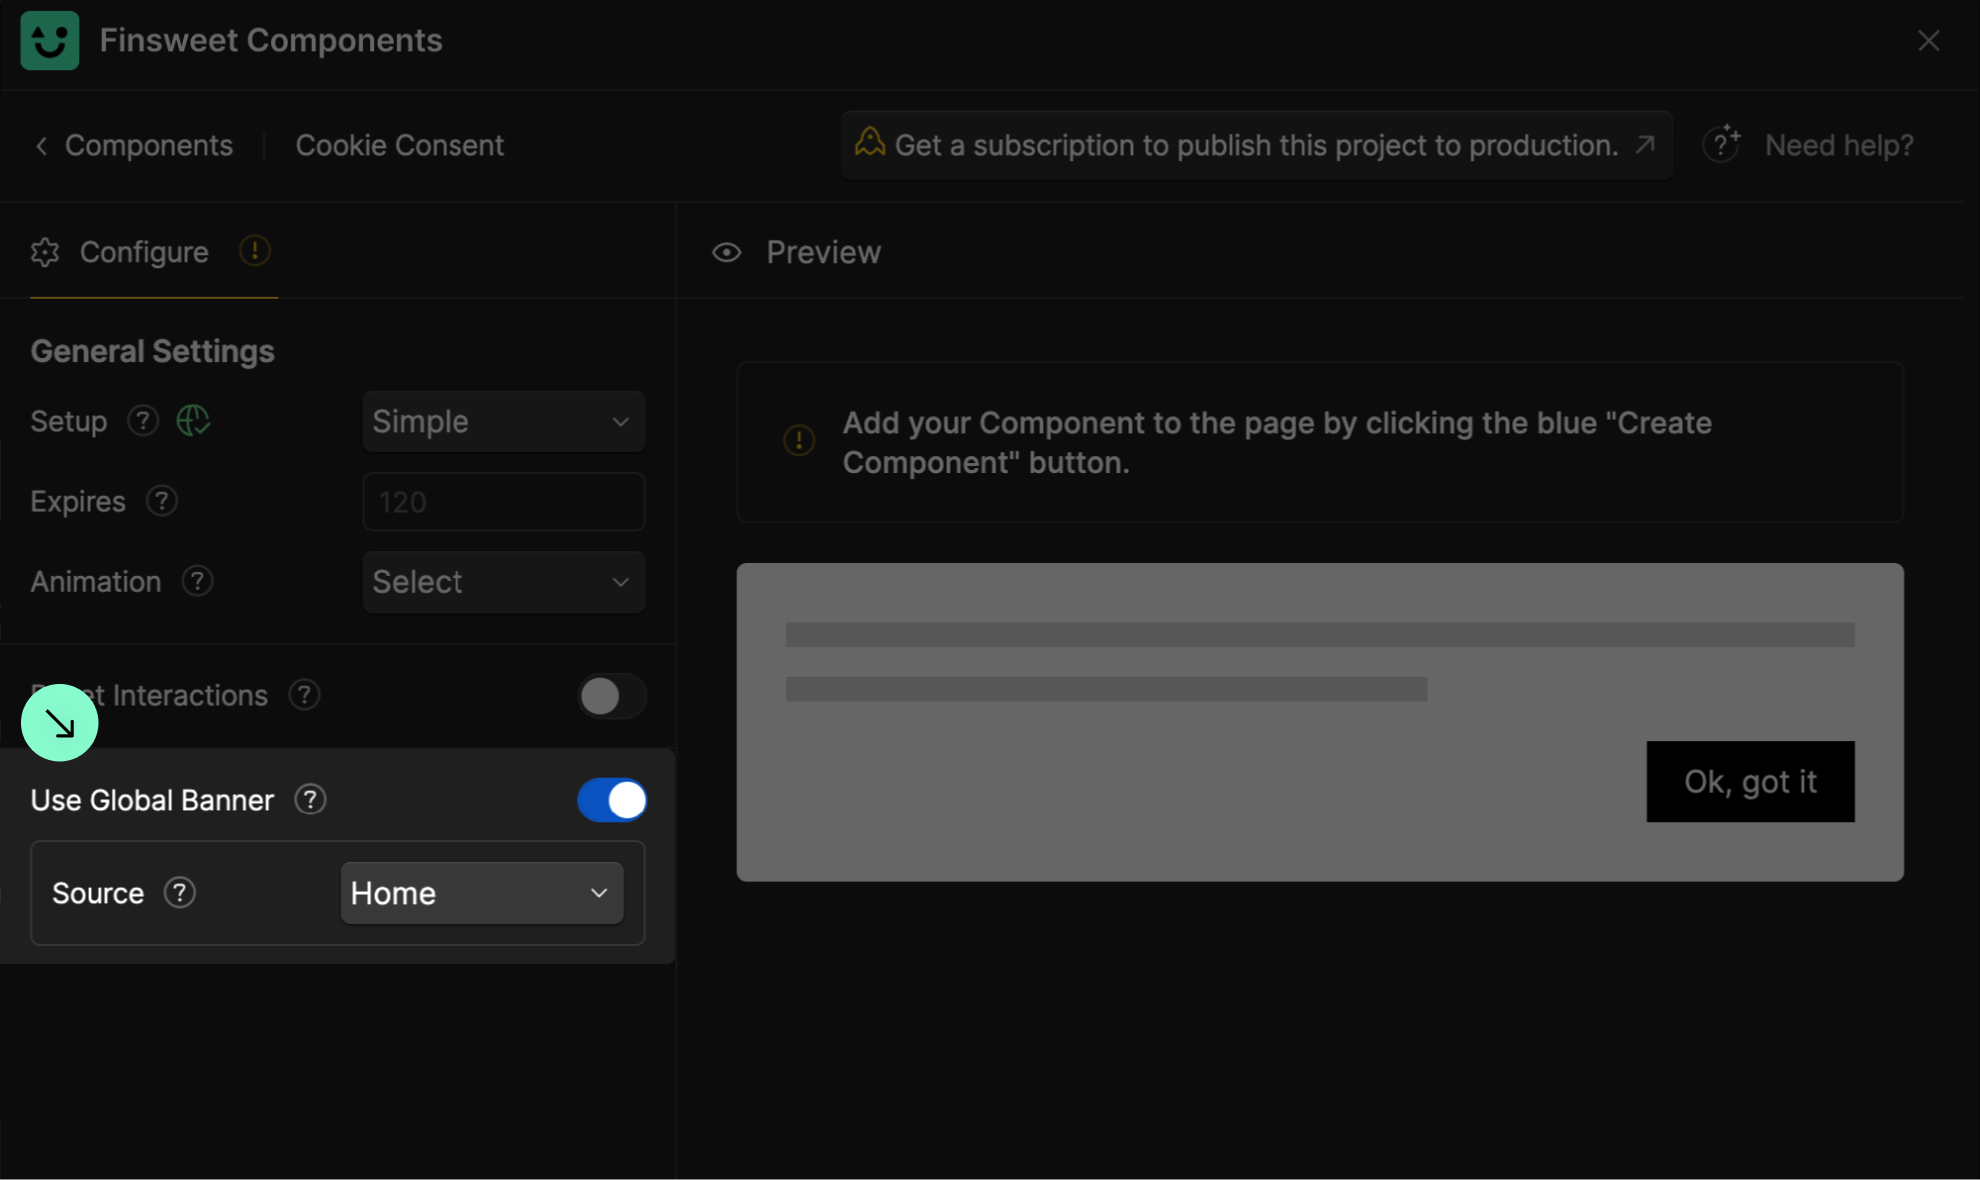
Global Banner will take one Cookie Consent Component and load it on every page of your project. Banners, preferences, and consent UI elements will work on every page of your project with Global Banner.

The 'Global Banner' option is incompatible with Webflow Localization. To translate the Cookie Consent banner, uncheck 'Use Global Banner' and add the banners manually. For more details, see How to Use Webflow Localization.

Use the open-preferences attribute to any element to make it a "Open Preferences Panel" button.
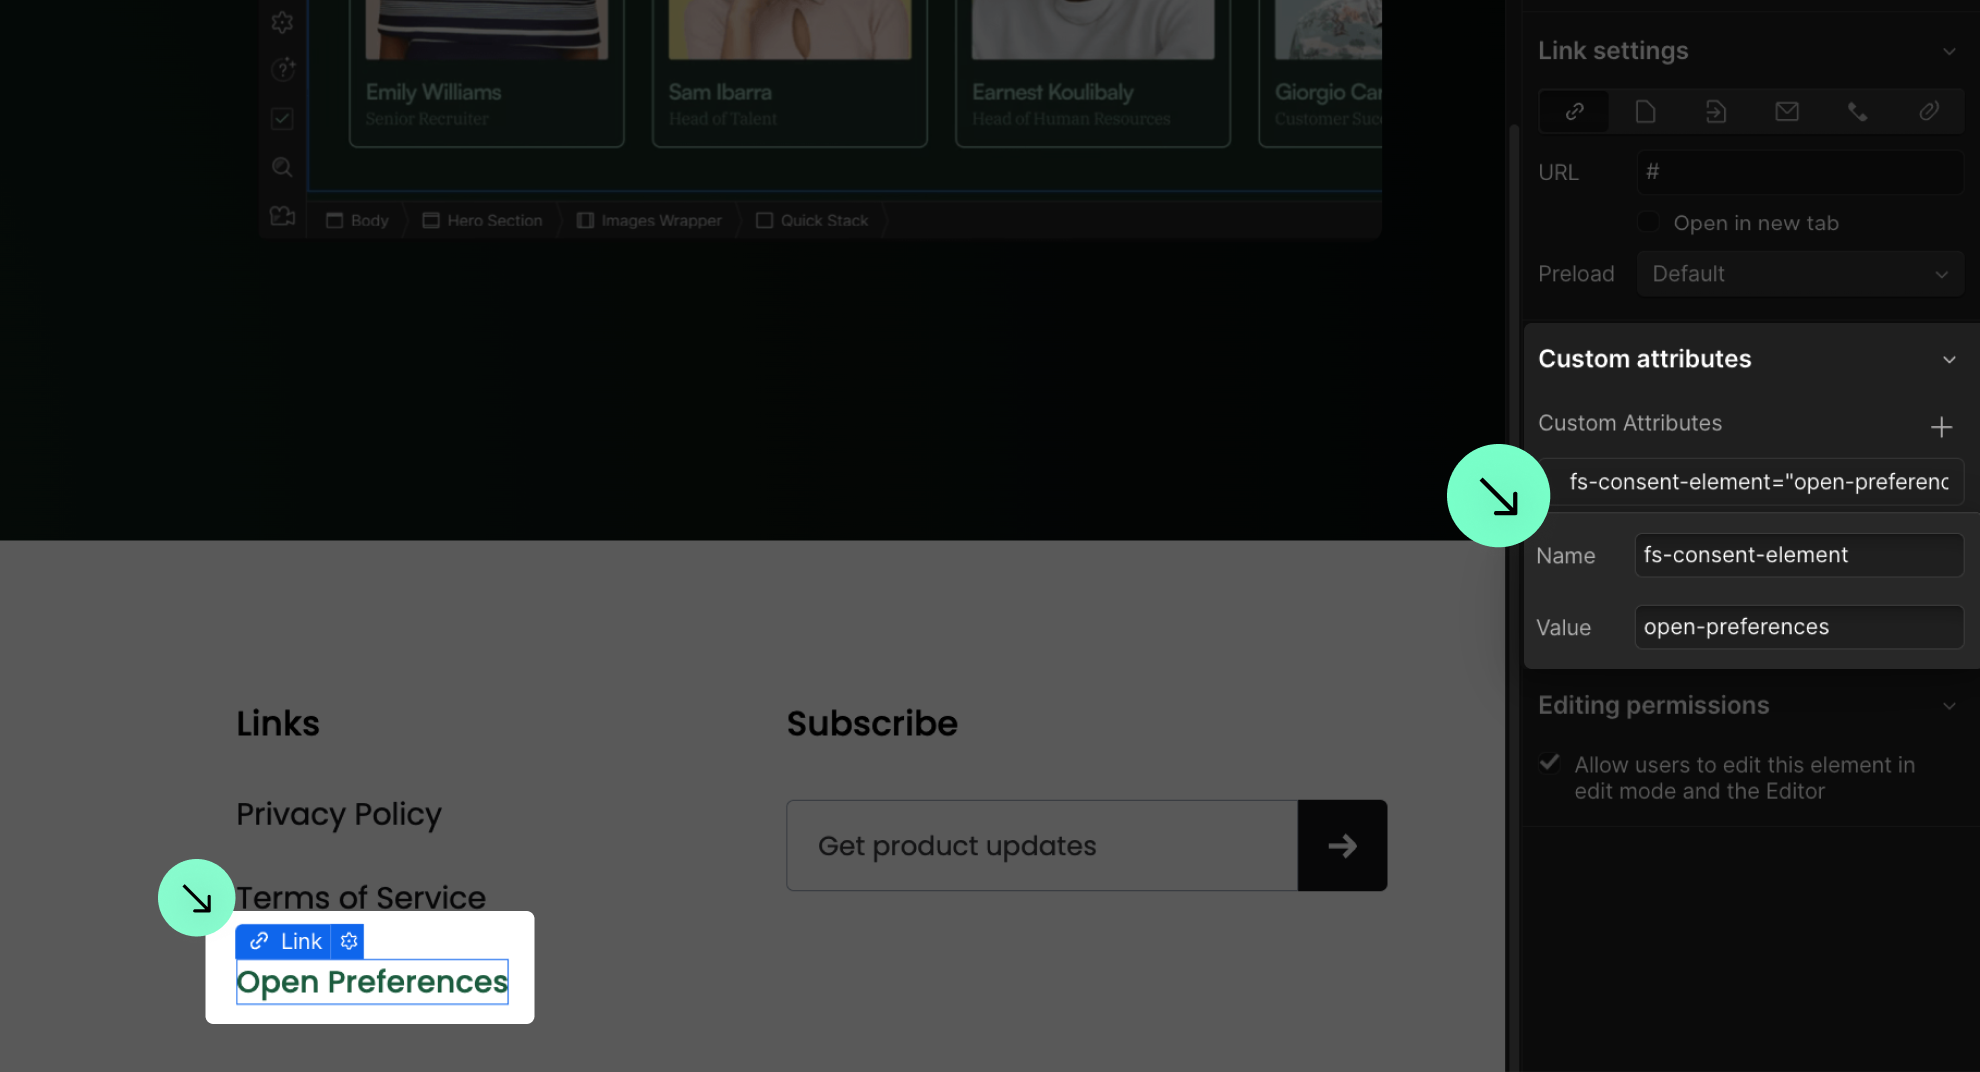
Use a text link, div block, or image act as the trigger to open the preferences panel. It's common to add a "Open Preferences" button in the footer of your website so a user can access their preferences on any page of the website. Add the attributefs-consent-element = "open-preferences" to any element to make it a trigger.

Use the placeholder attribute on a div block to serve as a placeholder.
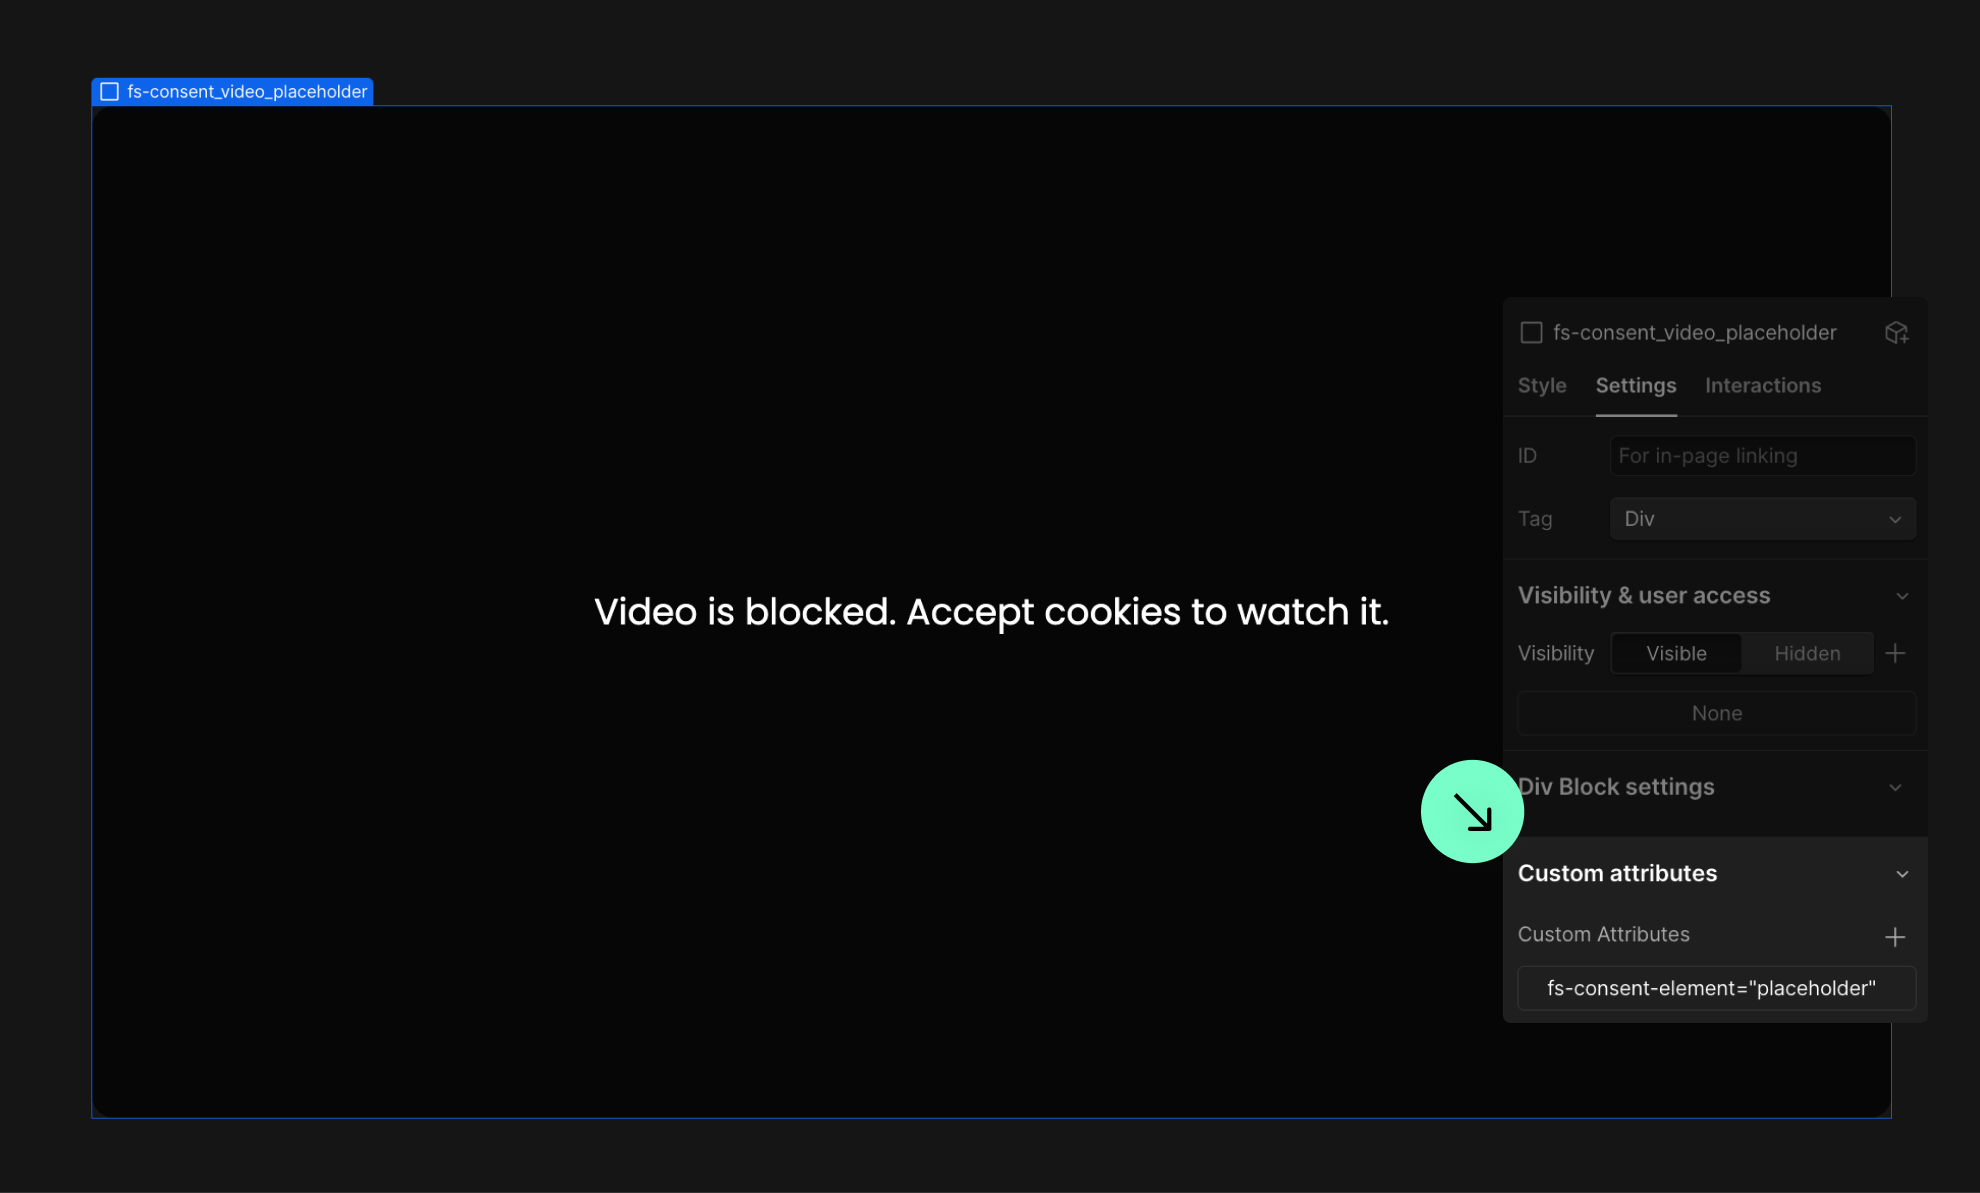
Use the attribute fs-consent-element="placeholder" on a div block with a message indicating that a video, map, or embedded content is blocked until the user consents. The placeholder will be displayed when the page loads and will be removed once the user accepts cookies.

See the documentation below for instructions on using placeholders with embedded videos and Google Maps:

About scripts and how the solution works

You must update each script in your project when using Full Setup.

We must be able to load and not load scripts on your website based on a user's consent preferences. For Finsweet Components to block the scripts before the user's decision, you to update each cookie-issue script in your project. The Scripts tab in the Finsweet Components App will help you through this process.

Scripts categorized as "Essential" will always load for the user.
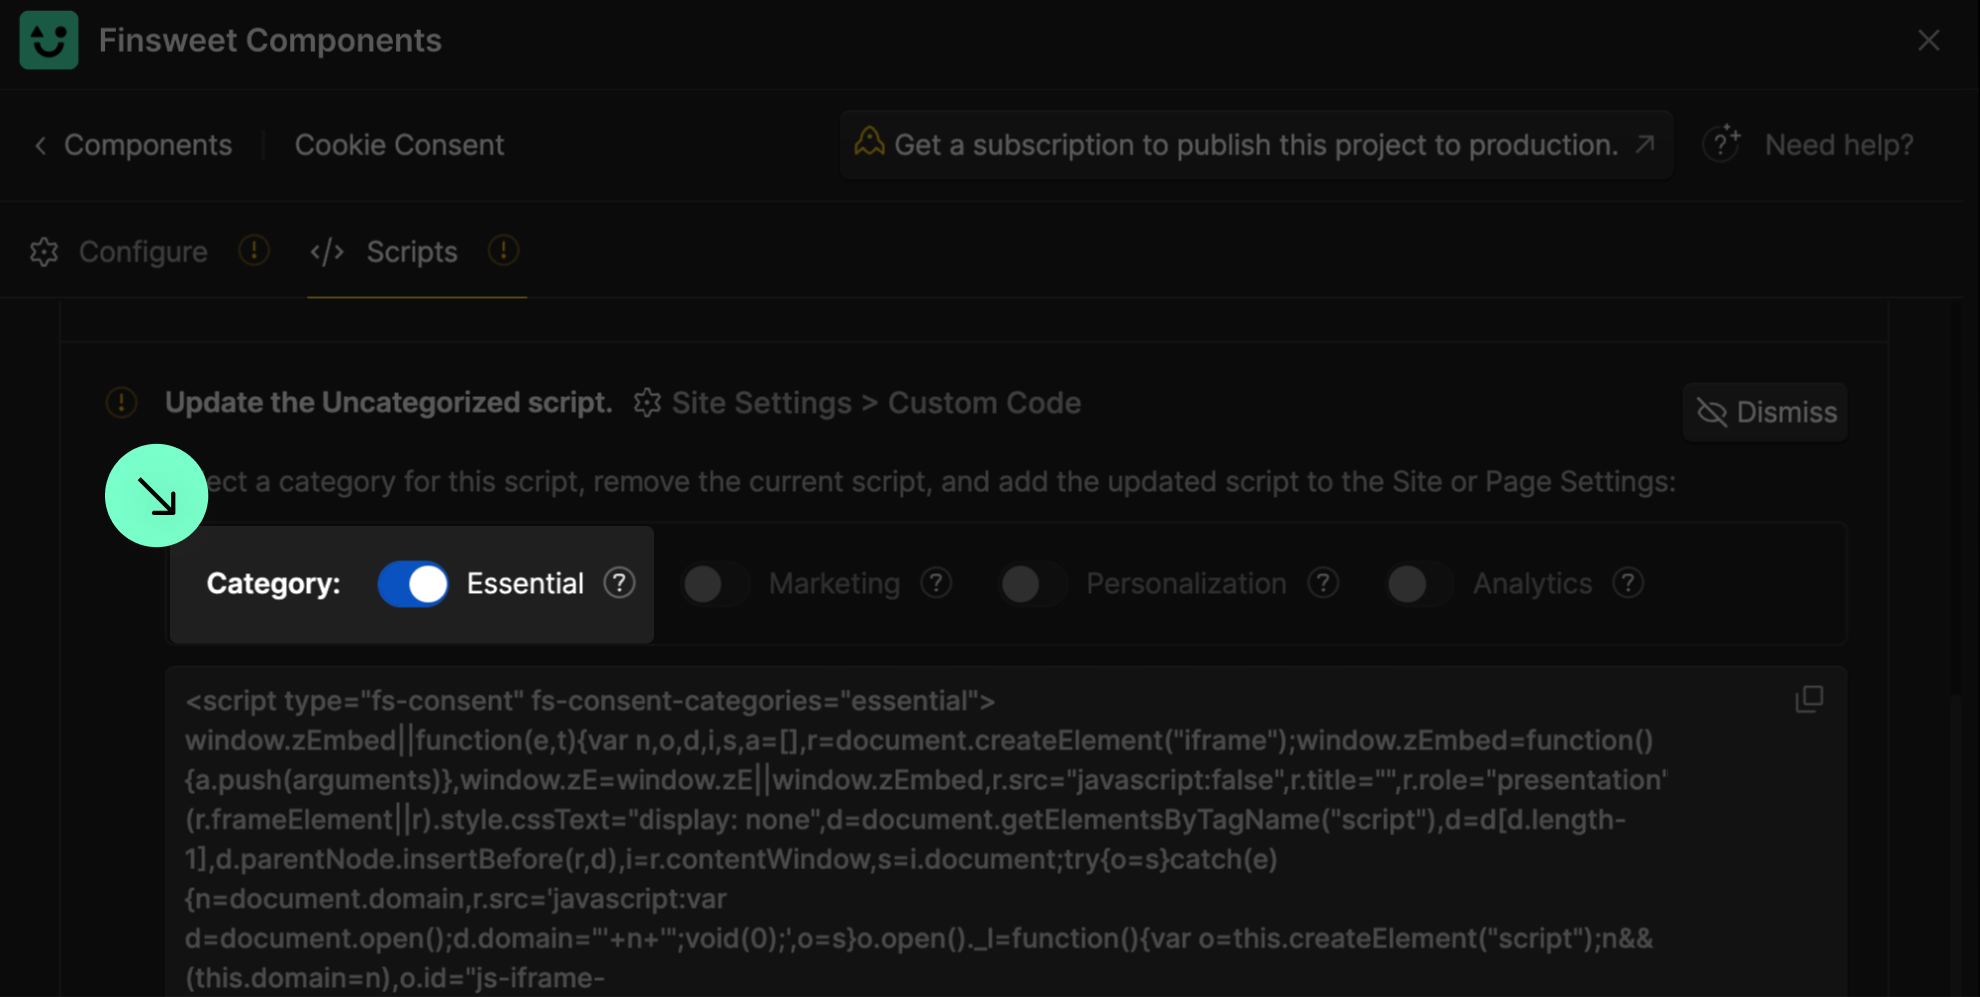
Only categorize a script as essential if you are sure this script is necessary for the essential functionality of the website and does not collect user data. Examples of essential scripts are:

Authentication Scripts: Used for login and user authentication processes to ensure secure access to user accounts.

Security Scripts: Protect the website from malicious activities, such as scripts for web application firewalls and bot detection.

Payment Processing Scripts: Required for secure payment transactions and to comply with PCI DSS (Payment Card Industry Data Security Standard) without storing personal payment data unnecessarily.

Accessibility Scripts: Improve the accessibility of the website for users with disabilities, such as scripts for screen readers or keyboard navigation enhancements.

Examples of scripts usually categorized as "Marketing".
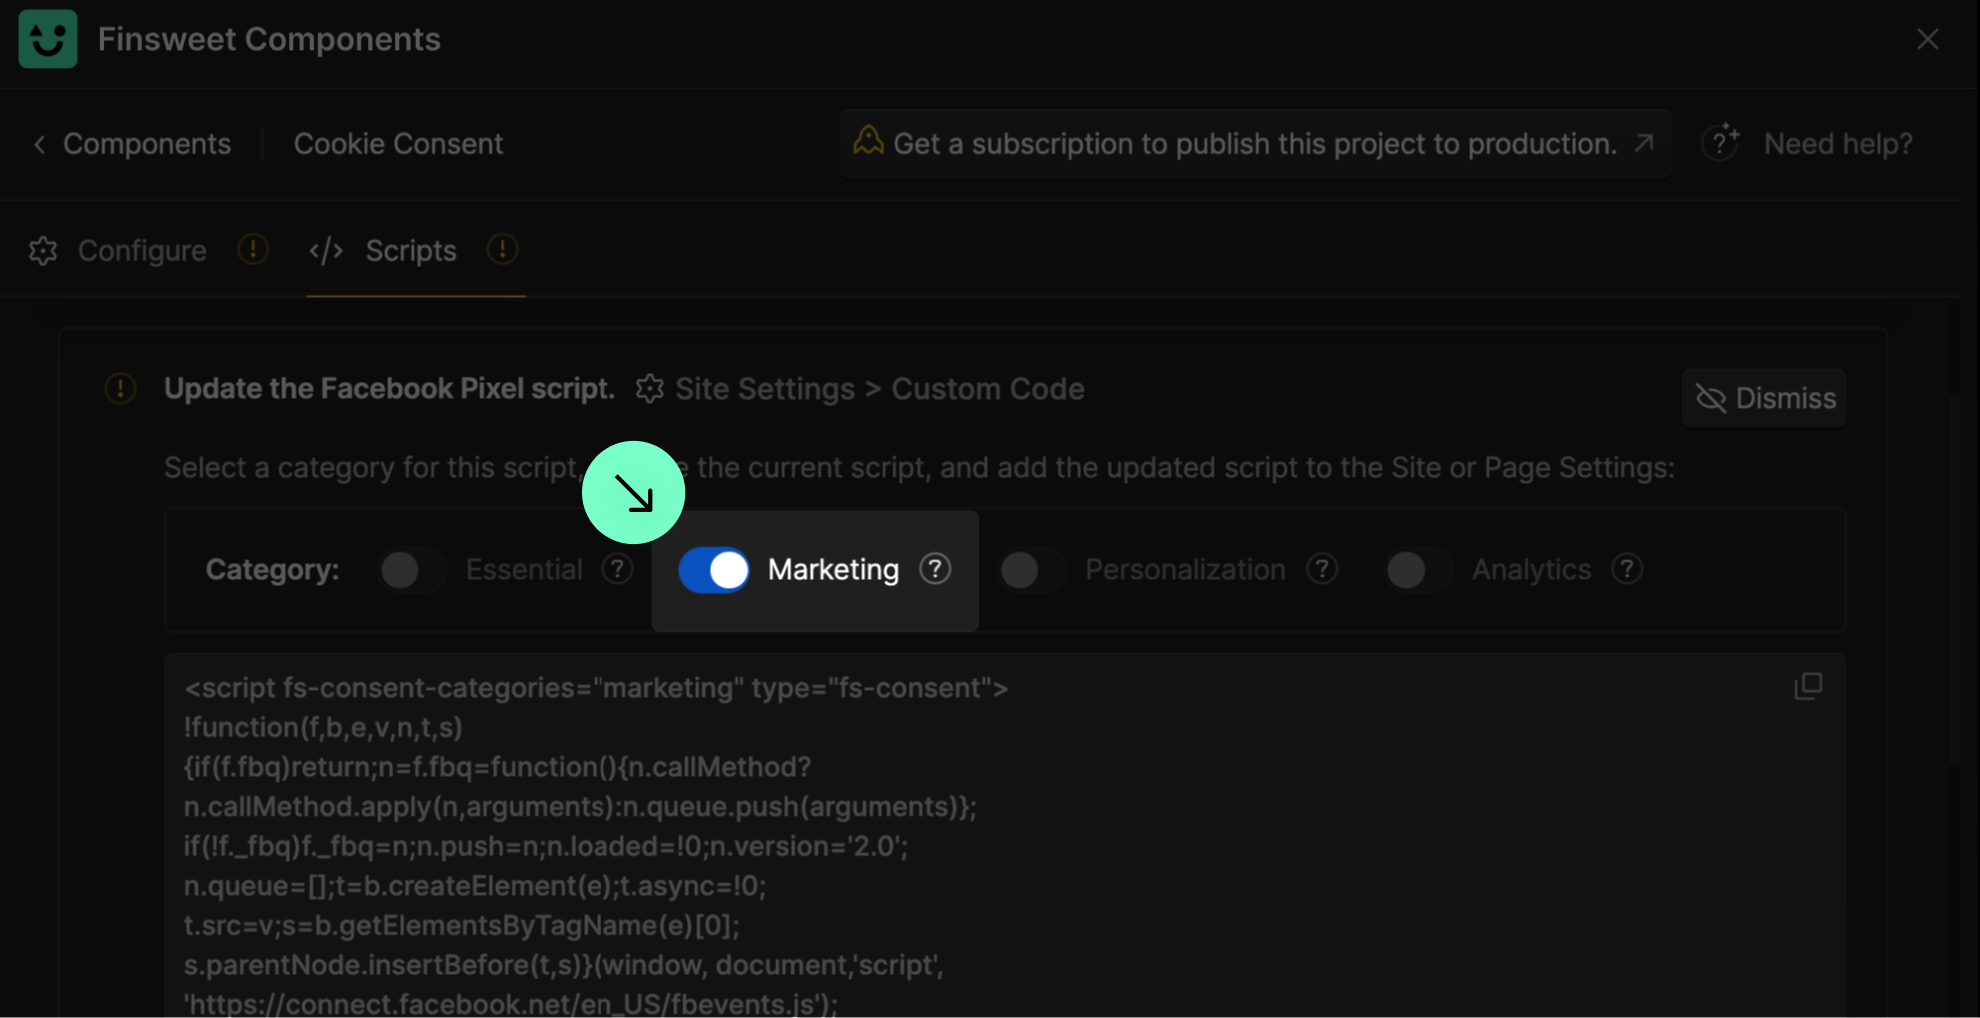
Scripts categorized as marketing typically involve tracking and analyzing user behavior to optimize advertising efforts and engage with users more effectively. Examples of such scripts include:

Tracking Pixels: Track user interactions across websites (e.g., Facebook, Google Ads).

Advertising Tags: Load ads from ad networks (e.g., Google AdSense, DoubleClick).

Retargeting Scripts: Show ads to users who have previously visited the site (e.g., AdRoll, Criteo).

Social Media Integration Scripts: Enable social media features and track interactions (e.g., Facebook SDK, Twitter pixel).

Email Marketing Scripts: Track email campaign engagement (e.g., Mailchimp, HubSpot).

Examples of scripts usually categorized as "Personalization".
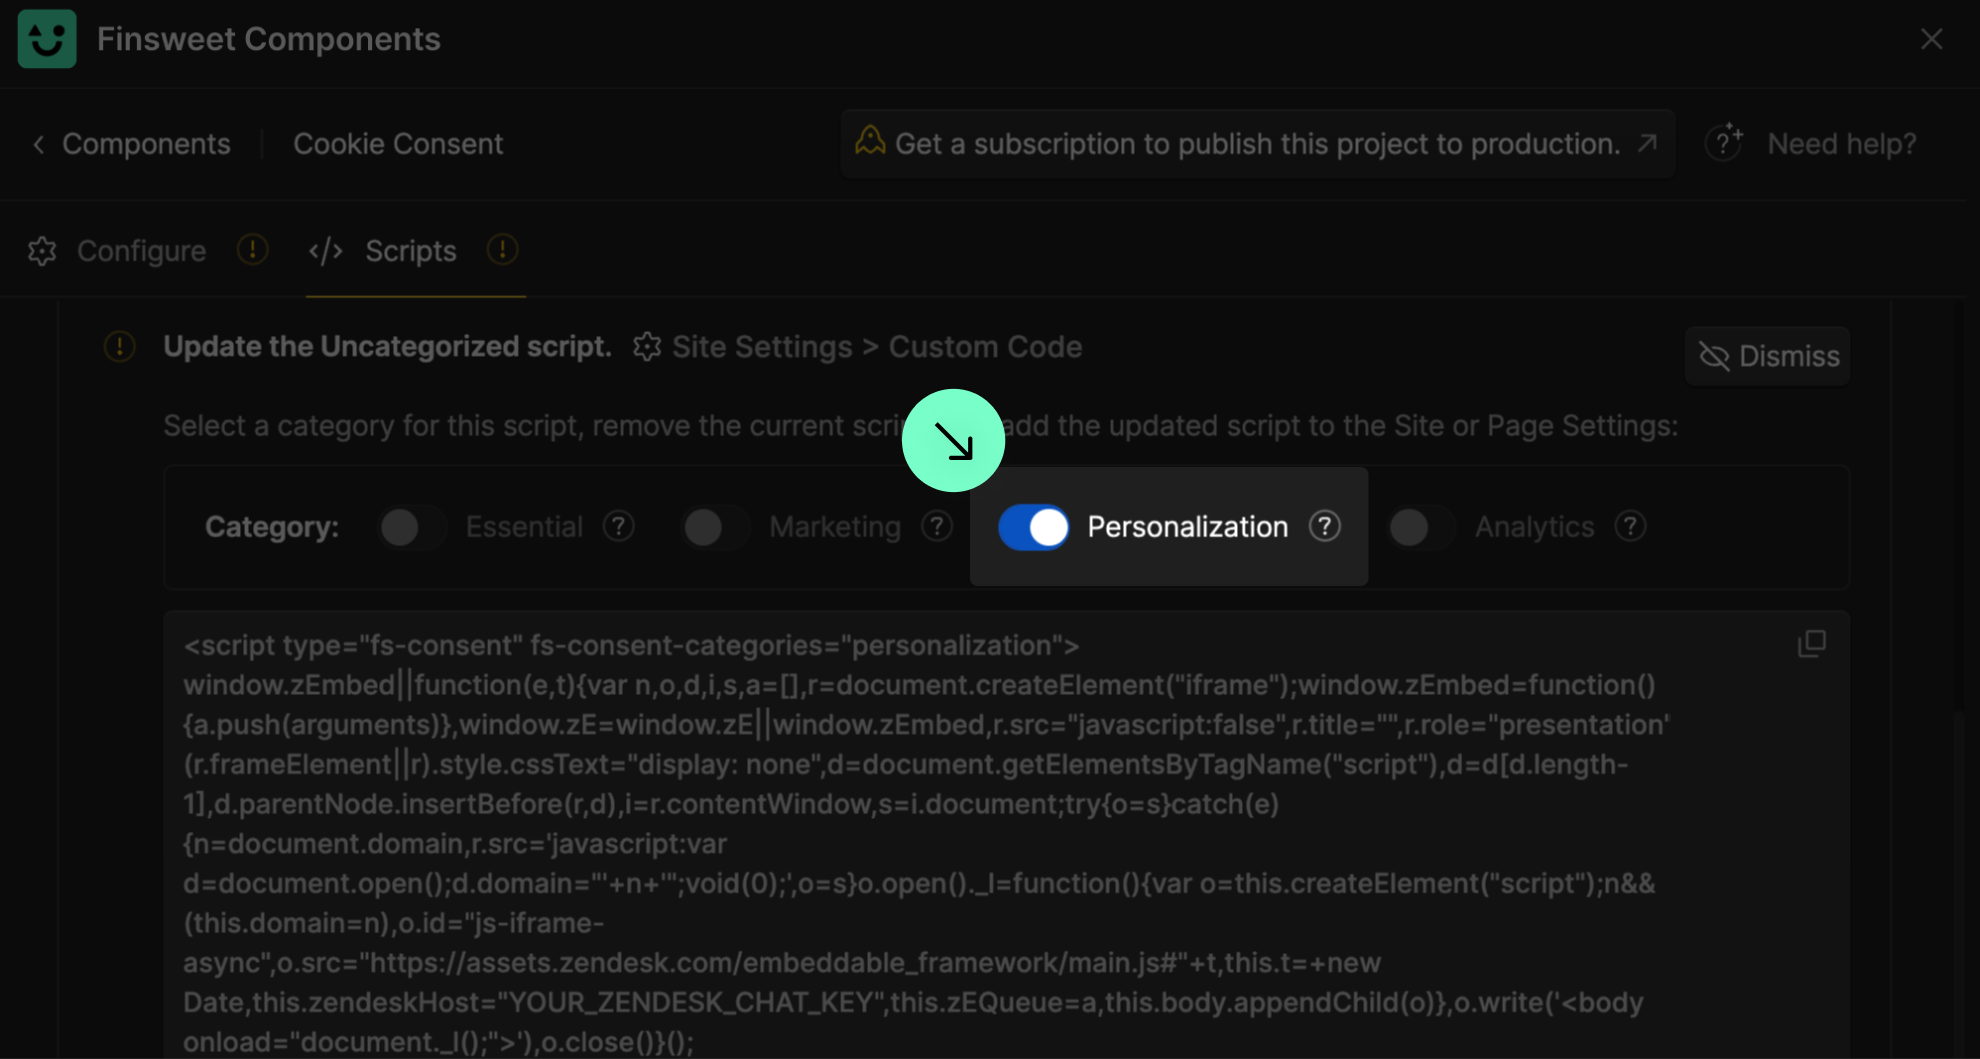
Scripts categorized as personalization typically enhance user experience by customizing content based on individual preferences and behaviors. Examples include:

Recommendation Engines: Suggest personalized content or products (e.g., Amazon product suggestions).

Dynamic Content Scripts: Adjust website content in real-time based on user behavior (e.g., personalized homepage banners).

User Preference Scripts: Save and apply user settings and preferences (e.g., language selection, theme settings).

Location-Based Personalization: Offer content relevant to the user's geographic location (e.g., local news, weather updates).

A/B Testing Scripts: Test and personalize different website versions for user segments (e.g., Optimizely, VWO).

Examples of scripts usually categorized as "Analytics".

Scripts categorized as analytics typically collect and analyze data on user behavior to improve website performance and user experience. Examples include:

Tracks website traffic and user behavior (e.g, Google Analytics).

Records user sessions and heatmaps (e.g, Hotjar).

You can translate or change the name of categories by updating the text field in Webflow.
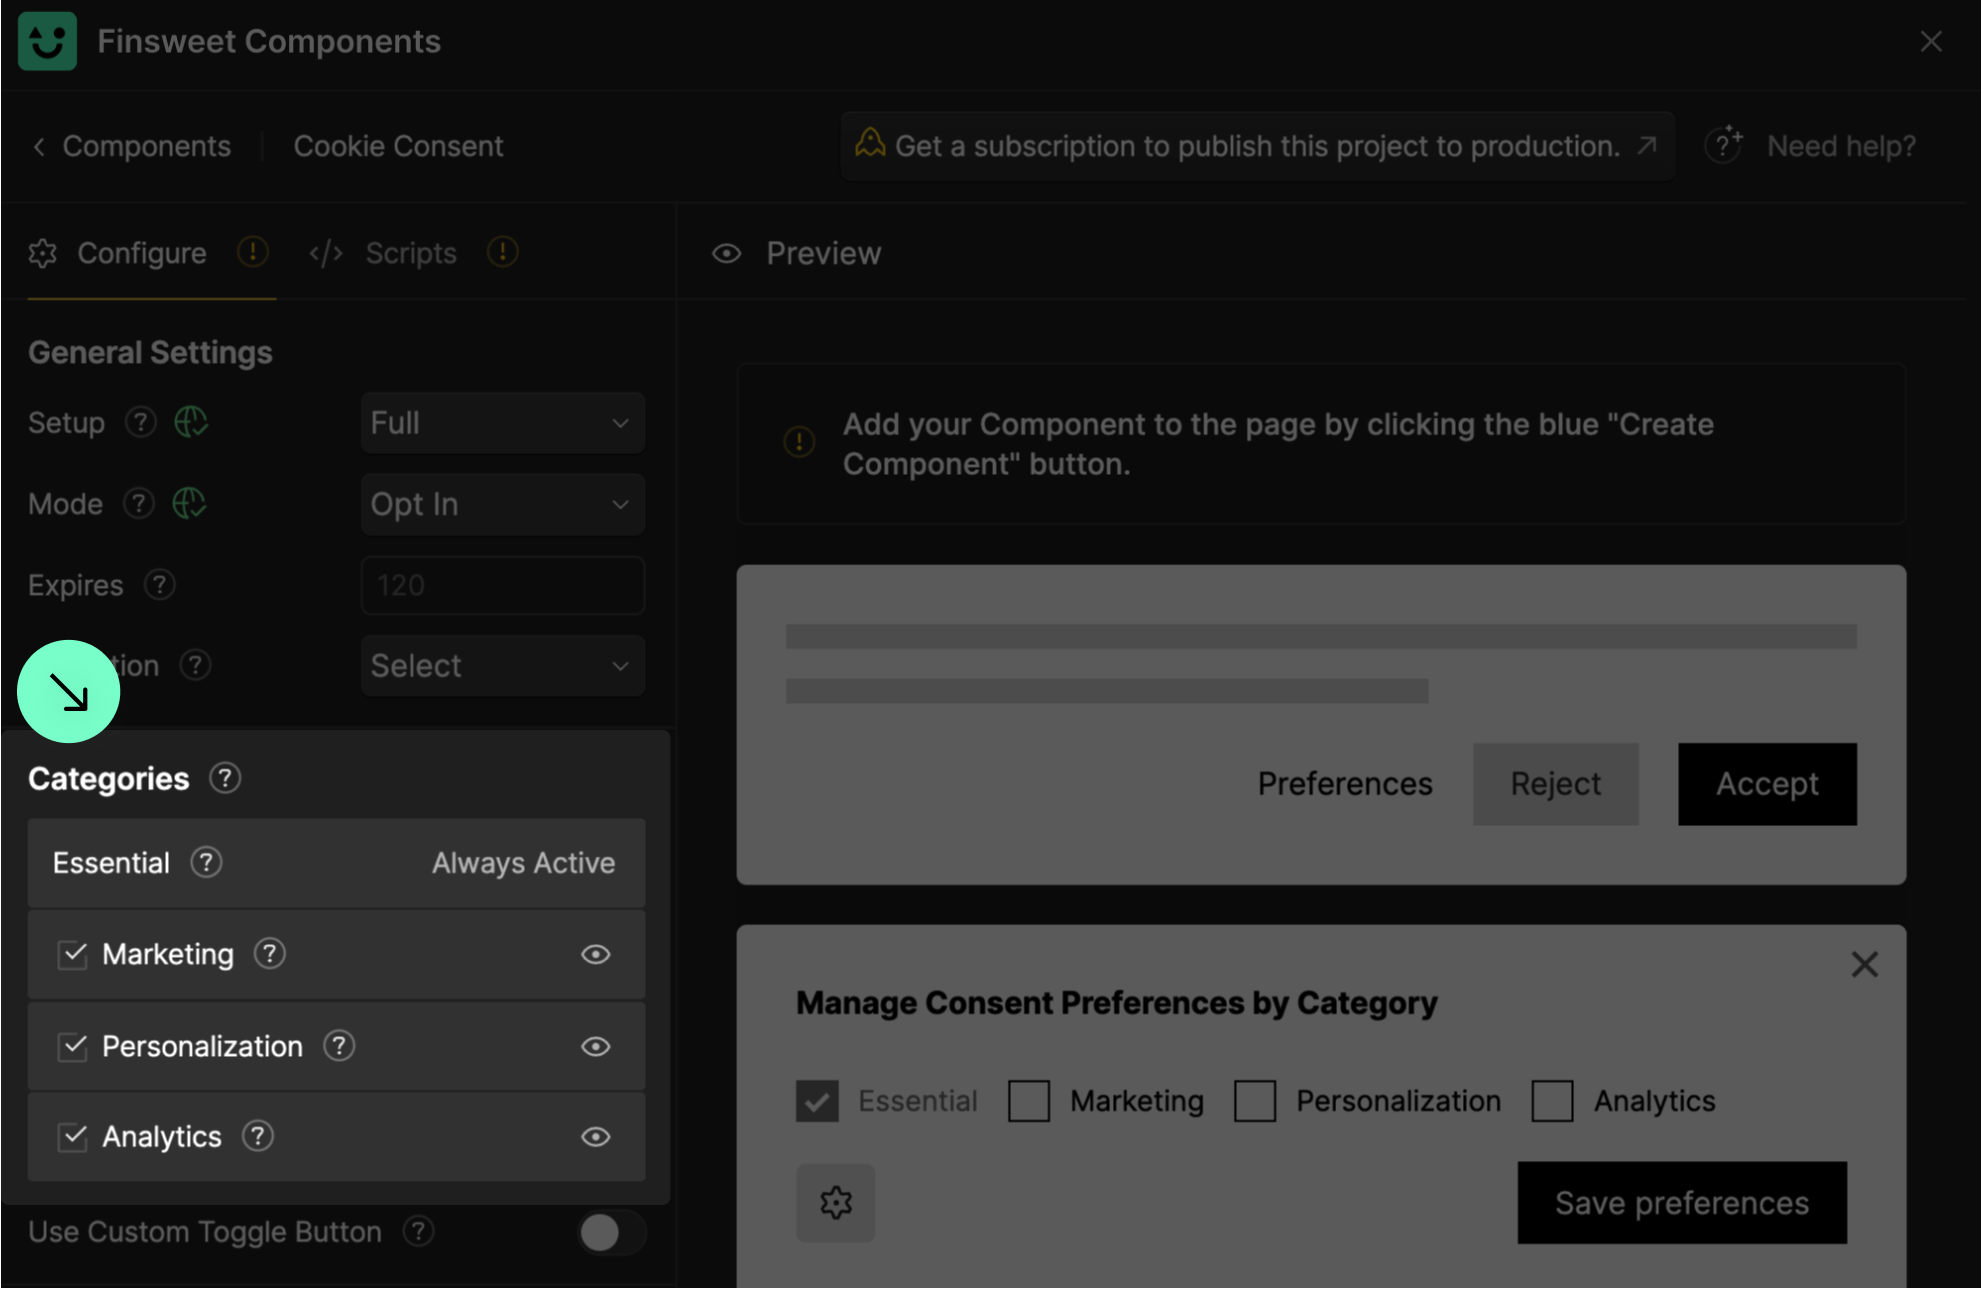
It is required to keep the categories set in Finsweet Components. However, the plain-text name on the front-end can be updated. For example, "Analytics" can be updated to "Analytik" by changing the text in Webflow Designer. Behind the scenes, Finsweet Components reads "Analytics."

After updating the script, it will look disabled. That's fine.
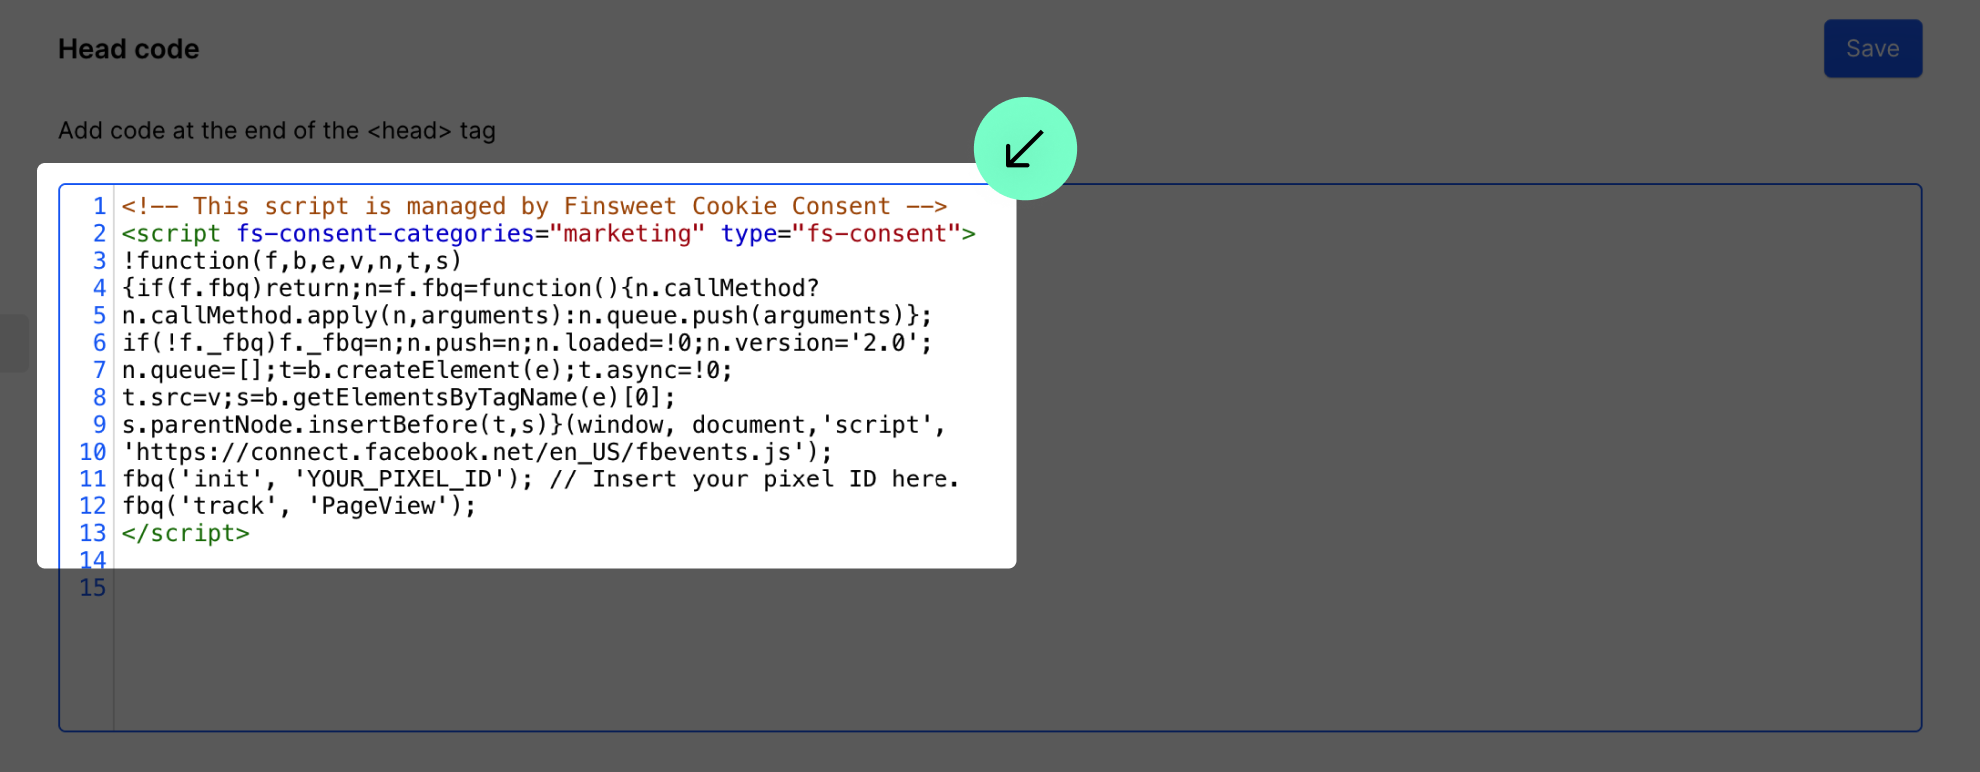
After updating the scripts, they will look like this. They will have a different color and lose highlighting. We are literally 'turning off' the script to make sure it doesn't run until the user consents to it.

Make sure you don’t have scripts duplicated in the project settings and the page settings.
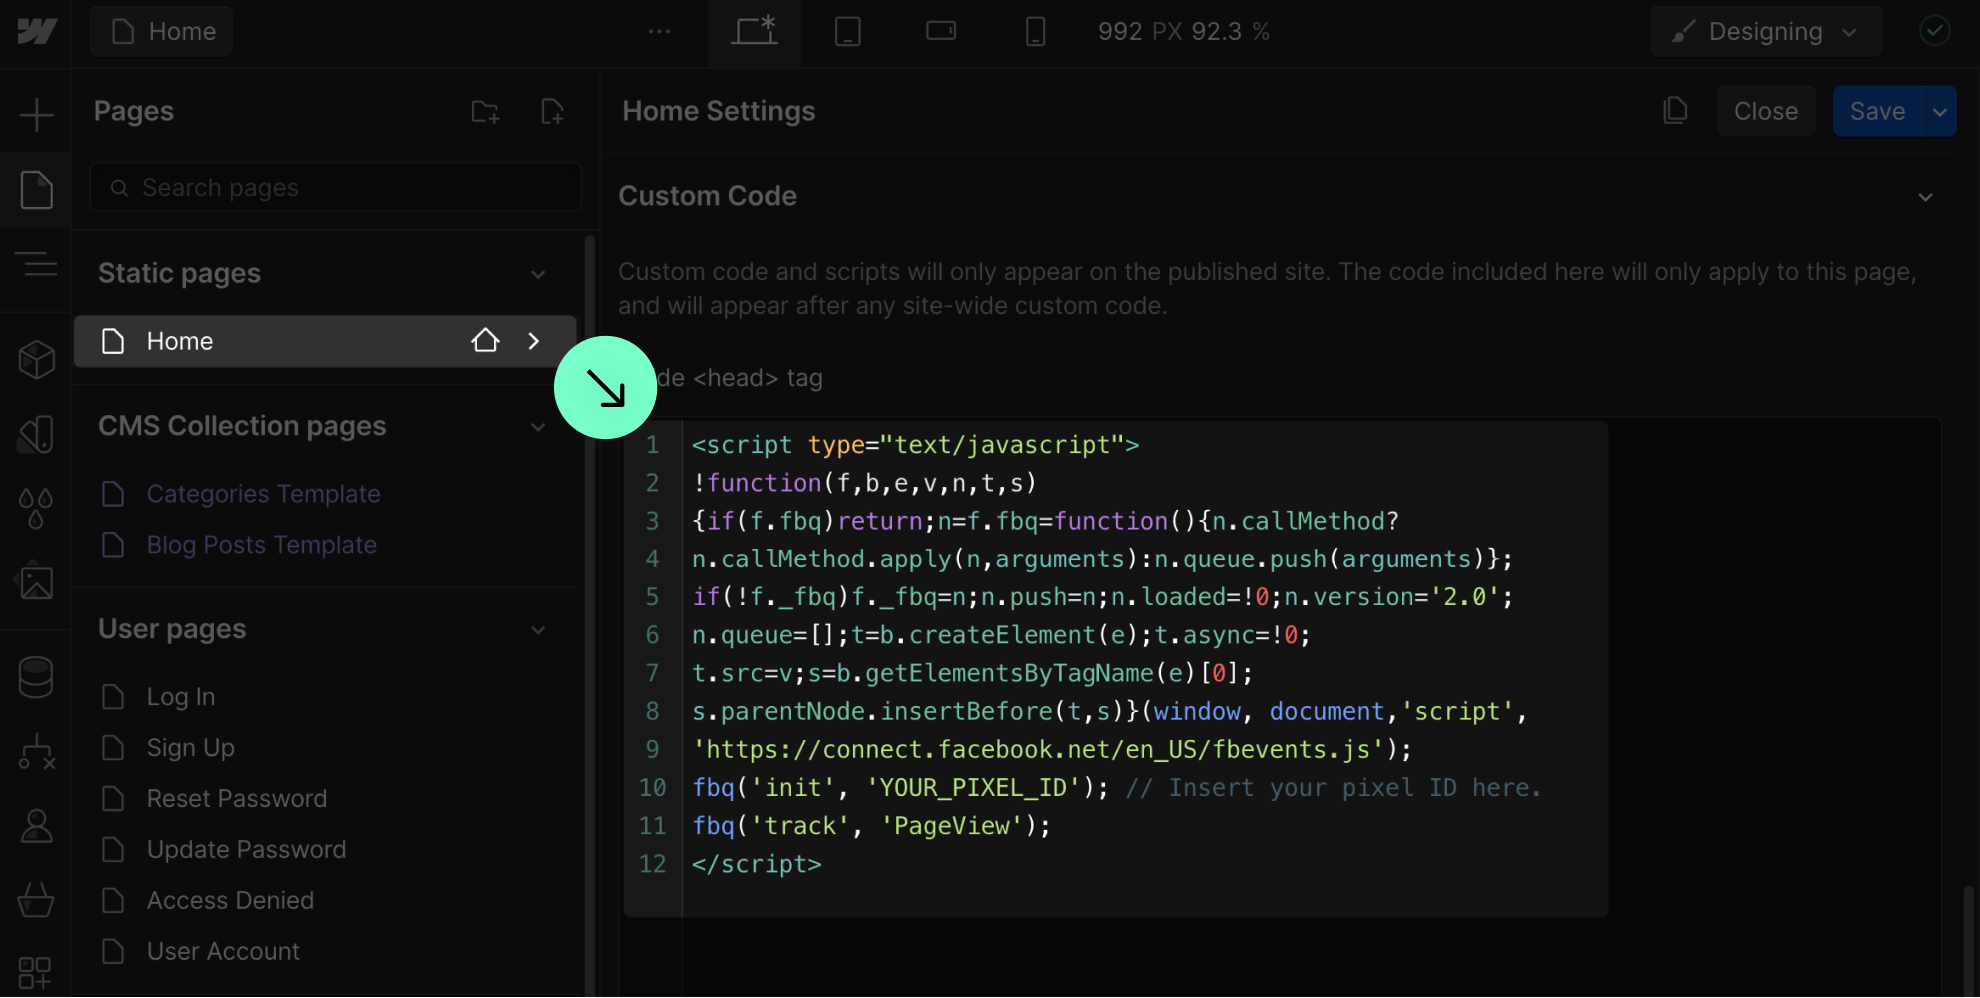
Duplicated scripts in both the project settings and the page settings can cause problems. We recommend managing all scripts that issue cookies in the custom code section of the site settings.

Do not use Google Analytics and Meta Pixel options 'App & Integrations' tab.
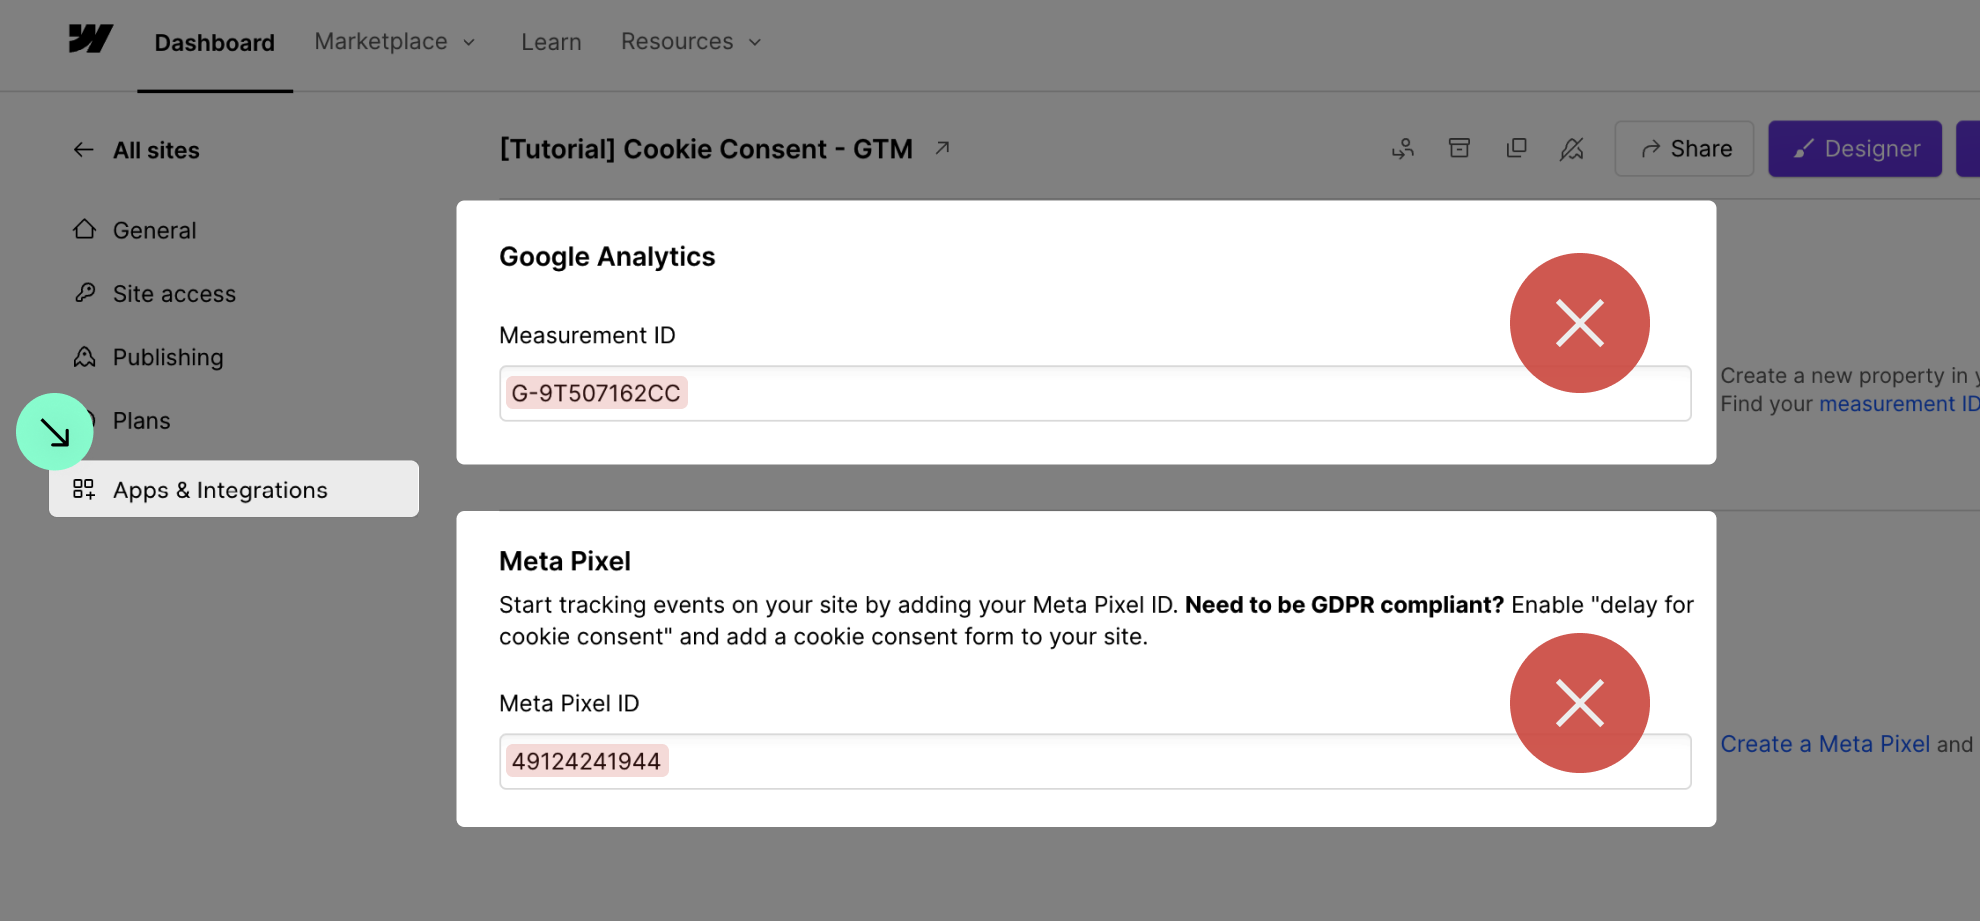
When Analytics and Meta Pixel are added in the 'App & Integrations' tab, we cannot prevent them from loading. These scripts will load without user consent, which is not GDPR compliant. Please add the full code snippet to the custom code section of the site settings.

If you use Google Tag Manager to add your scripts, you will need to do a manual setup.

Follow the tutorial below to learn how to add the scripts using Google Tag Manager:

Watch Tutorial

If you use Webflow Localization, do not select the 'Global Banner' option.

It is not possible to translate the Cookie Consent banner using the 'Global Banner' option. If you want to use Webflow Localization, make sure to add the Cookie Consent component manually to all pages. For more details, see the How to Use Localization documentation below:

How to use Localization

About GDPR & Compliance

The most compliant solution is the Full Setup with preferences panel and Opt-in method.
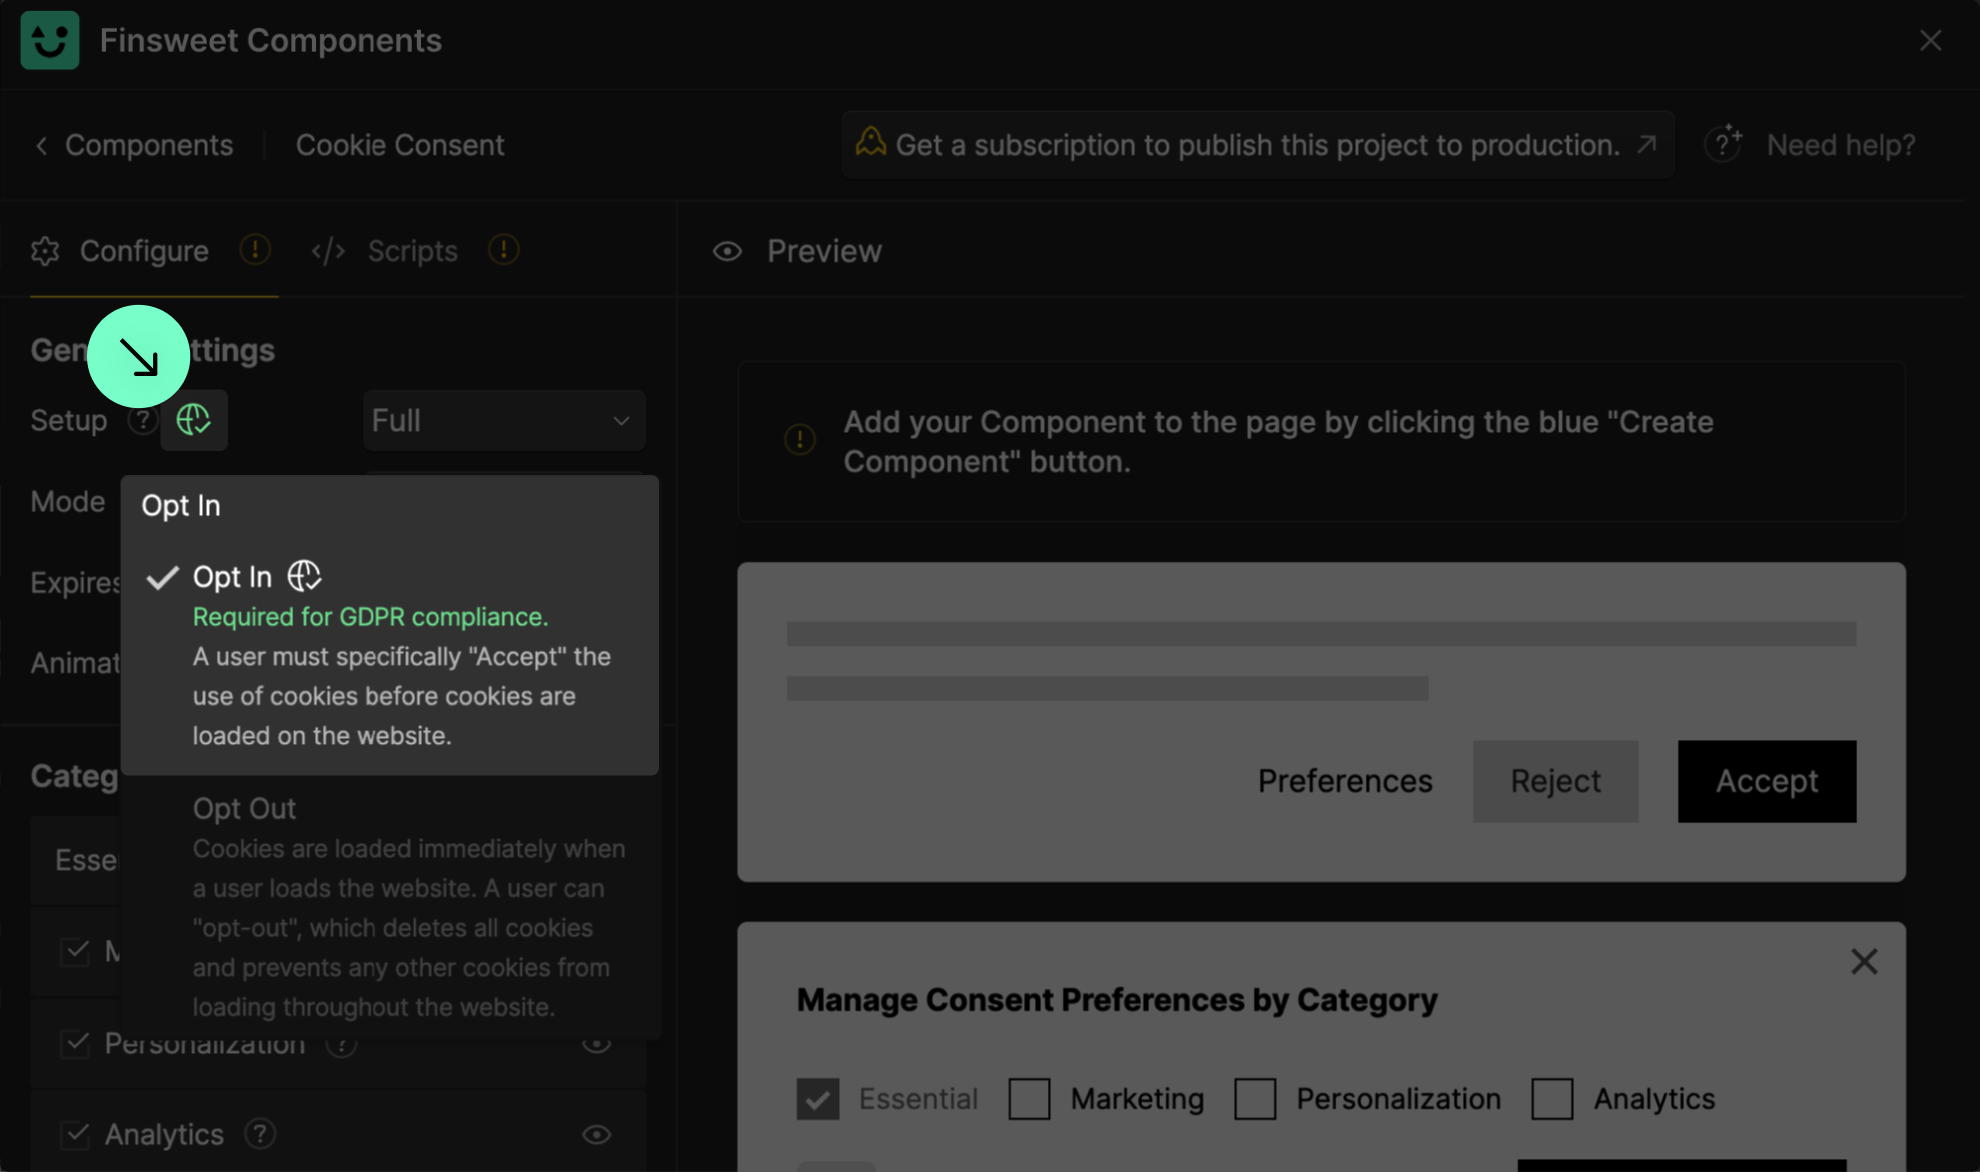
The required configs to make your website fully GDPR compliant are indicated with this green icon below:

Storing consents is required for a fully GDPR-compliant website.

Storing consents is essential for GDPR compliance as it provides proof of user consent, ensures accountability, and helps manage user rights regarding their data. It supports transparency by maintaining records of what users have agreed to, and is necessary for responding to regulatory audits or legal disputes. Properly stored consents also facilitate updates and management of user preferences, demonstrating the organization's commitment to data protection and privacy

Not all websites require this level of GDPR compliance. Compliance and regulations are based on country and the location of users accessing your website. Follow the tutorial below to learn how to store consents:

Watch Tutorial

Integrating Webflow's Analyze and Optimize features to comply with data laws

Webflow Analyze and Optimize track what visitors do on your site. Finsweet Components Cookie Consent offers users a consent banner to select their tracking preferences. We've built an integration to use Cookie Consent as the UI for Webflow Analyze and Optimize user preferences.

To integrate Cookie Consent with the Analyze and Optimize features in the Insights panel, follow the tutorial below:

Watch Tutorial

YouTube videos are not GDPR compliant. Make sure to use embedded iFrames to give users control.

If you embed YouTube videos using Webflow's native video element on your page, personal data of the user is automatically passed on to YouTube and its parent company, Google, as soon as the user visits your website. To prevent this, we recommend using a code embed element. Please check the documentation below:

Learn how to embed videos

Webflow's map is not GDPR compliant. Use embedded Google Maps to give users control.

Webflow's native map element automatically transfers personal data to third parties like Google without user consent. To ensure privacy and give users control over their data, it's recommended to use embedded Google Maps. Please check the documentation below:

Learn how to embed maps

Google Fonts loaded from Google's API are not GDPR compliant. Make sure to use them locally.

Google Fonts, when loaded directly from Google's API, can lead to the automatic transfer of user data to Google servers without consent, violating GDPR regulations. To ensure compliance and protect user privacy, it is recommended to download the fonts and host them locally on Webflow. Please check the documentation below:

Learn how to use Google Fonts

Webflow's native reCaptcha is not GDPR compliant. Add it manually to ensure compliance.

Webflow's native reCaptcha is not fully GDPR compliant because it automatically collects user data (like IP addresses and behavior) without explicit consent. To ensure compliance and protect user privacy, it's recommended to add it manually to your forms following the guide below:

Learn how to use reCaptcha

<noscript> tags are not Cookie Consent compliant. Make sure to remove them.

All <noscript> tags run even if JavaScript is disabled. This undermines the purpose of cookie consent and GDPPR compliance by potentially allowing the collection of user data without proper consent. It is required to remove all <noscript> tags from your website.

Attributes

Components

Component
Allowed elements
Attribute
Description
Banner
Div, Section
fs-consent="banner"
Applied to the outer parent of the entire banner element.
Manager
Div, Section
fs-consent="manager"
Applied to the outer parent of the fixed cookie icon that allows the user to open preferences.
Preferences
Div, Section
fs-consent="preferences"
Applied to the outer parent of the preferences UI.
Consents Form
Form
No attribute is needed.

This Component can be placed inside Banner and/or Preferences.
The Form element that contains the preference checkboxes. The Consents Form can be placed inside the Banner and/preferences Component.

Triggers for functionality

Functionality
Allowed elements
Works inside
Attribute
Description
Allow all cookies
Button, Text Link, Link Block, Div, Text Block
Banner, Preferences
fs-consent="allow"
Accepts all cookies.
Deny all cookies
Button, Text Link, Link Block, Div, Text Block
Banner, Preferences
fs-consent="deny"
Denies all cookies.
(except essential cookies)
Close
Button, Text Link, Link Block, Div, Text Block
Banner, Preferences
fs-consent="close"
Closes banner or preferences manager without making any Allow/Deny/Save selection.
Open Preferences
Button, Text Link, Link Block, Div, Text Block
Any element on the page
fs-consent="open preferences"
Opens Preference Manager.
Marketing Toggle
Checkbox
Consents Form
fs-consent-checkbox= "marketing"
When checked, users will allow all Cookies from the marketing category.
Personalization Toggle
Checkbox
Consents Form
fs-consent-checkbox= "personalization"
When checked, users will allow all Cookies from the personalization category.
Analytics Toggle
Checkbox
Consents Form
fs-consent-checkbox= "analytics"
When checked, users will allow all Cookies from the analytics category.
Save Preferences
Submit Button, Button, Text Link, Link Block, Div, Text Block
Consents Form
fs-consent="submit"
When clicked, the new preferences from the user will be stored and the component will close.
Webflow Interaction
Div (must be set to display: none)
Banner, Manager, Preferences
fs-consent="interaction"
If this Div is placed inside the component, the script will use Webflow's Interactions to open/close it. Read Webflow Interactions for more information.

Other attributes

Use
Placed on
Attribute
Description
Identify cookie issuing scripts
<script> tag of third-party script
type="fs-consent"
Placed as an attribute on the script tag.

Don't understand how to add this? Go to The Cookie Oven
Identify categories of cookie issuing scripts
<script> tag of third-party script
fs-consent-categories="marketing"
fs-consent-categories="marketing, analytics"
Placed as an attribute on the script tag. Accepts:

"essential"
"marketing"
"personalization"
"analytics"

Apply multiple categories to fs-cc-categories attribute by comma separating category names.

Don't understand how to add this? Go to The Cookie Oven
Specify the cookie consent option you're using
<script> tag of the Finsweet Cookie Consent script
fs-consent-mode="opt-in"
Placed as an attribute on the script tag. Accepts:

"informational"
"opt-out"
"opt-in"

Don't understand how to add this? Go to The Cookie Oven
Specify when the user's cookie consent selection expires
<script> tag of the Finsweet Cookie Consent script
fs-consent-expires="180"
Placed as an attribute on the script tag. Accepts any number:

fs-cc-expires="NUMBER_OF_DAYS"

Default is 180 days. Using "30" as the values would make the user's select expire in 30 days.

Don't understand how to add this? Go to The Cookie Oven
Visual debug tool when something isn't working
<script> tag of the Finsweet Cookie Consent script
fs-consent-debug="true"
FOR TESTING ONLY. NOT FOR LIVE PRODUCTION WEBSITE.

We built a visual debugging tool that notifies you of missing elements and common mistakes implementing Finsweet Cookie Consent.
Don't understand how to add this? Go to The Cookie Oven
POST consent to API endpoint
<script> tag of the Finsweet Cookie Consent script
fs-consent-endpoint="URL"
Optionally send consents to an API endpoint, so you can store consent records in your database. More information here.
Dynamically loaded components from a different page
<script> tag of the Finsweet Cookie Consent script
fs-consent-source="URL"
If set, the components (Banner, Manager and Preferences) will be fetched from the specified URL and rendered to the current page. This way, you won't have to manually place them into each single page of the website.

Accepts both absolute URLs (fs-cc-source="https://example.com/components") and relative paths (fs-cc-source="/components").
Default display property
On the Banner, Manager and Preferences components
fs-consent-display=
"PROPERTY_NAME"
If this attribute is set and no interaction is used for displaying the component, the default fade animation will set this display property.

Avaiable properties are: block, flex, grid, inline-block, inline.

Defaults to flex.
Disable scroll
On the Banner or Preferences component.
fs-consent-scroll="disable"
If placed on the Banner component, the body locks and page scrolling is disabled when the Banner is visible.

If placed on the Preferences component, the body locks and page scrolling is disabled when Preferences are visible.
Modify the domain target when storing the Consents Cookie.
<script> tag of the Finsweet Cookie Consent script
fs-consent-domain= "DOMAIN_NAME"
Allows subdomain.example.com to store the Consent Cookie at domain level using fs-cc-domain="example.com". The cookie will be set using example.com instead of subdomain.example.com.

Legal Disclaimers

Understand the entire Agreement for using Finsweet Products

Check out our Legal agreements and policies for Products and Services page at finsweet.com/legal.

Understand your responsibility for compliance and security

Check out our User Responsibility for Compliance and Security page at finsweet.com/legal/user-responsibility-for-compliance-and-security.

About legacy Finsweet Cookie Consent

This information is related to the old Cookie Consent solution created by Finsweet. Check the legacy documentation here.

Will the legacy cookie consent stop working now that the new version is launched?

No, the Legacy Cookie Consent will still work normally. However, this solution is deprecated and will no longer receive new features, but it will continue to be maintained.

What is the difference between the legacy Cookie Consent and the new Cookie Consent solution?

The new Cookie Consent is fully integrated with Google Consent Mode V2, enabling websites to run Google services while respecting user consent choices for ads and analytics. The Cookie Consent component generated by the Finsweet Components app is also easier to configure and style natively within Webflow, offering users more customization options.

About the plans

What will happen to my current subscription for all components?

The special launch offer with the 'all components' subscription is no longer available. Subscribers to this plan will keep the $10 monthly price for all current and future components as long as they maintain the subscription.

How do bulk discounts work?

  • Bulk discounts apply to Project Lifetime plans only.
  • Designed for agencies, freelancers, and big projects.
  • All Components must be purchased in a single checkout to qualify for a bulk purchase discount.
  • You can purchase any combination of Components to qualify for bulk discount. For example, you can purchase 6 Slider Components, 2 Tabs Components, and 4 Cookie Consent Components to quality for the 10+ Components discount.
  • You can use purchased Components on any site at any time. Once you assign a domain to a Project Lifetime purchase, that domain is "locked in" for that Component. However, there's no time limit to set the domain. You can choose to assign a domain at any point in the future, and the Component will activate on that domain once it's locked in.

Buy 3-5 Components = 15% discount 
Buy 6-9 Components = 25% discount
Buy 10+ Components = 30% discount

What if my domain name changes?‍

Monthly/Annual subscriptions: 

You can change your domain name at any time in the future while paying for the subscription. If you want to use your subscription with a different domain, go to my.finsweet.com/subscriptions, find your subscription, and change your site domain URL.

Project Lifetime plan: 

You can change your domain name at any time in the future, as long as it's for the same project or company. When you're buying Project Lifetime, you're buying the ability to use the Component for the lifetime of the project.

We'll be lenient with domain changes, but will not allow abuse of the pricing model. We will not accept domain name changes that are clearly for different projects.

What is a Project Lifetime plan and who is this for?

Finsweet Components will work on the published page forever after your one-time payment. Purchase "Project Lifetime", set the domain name, and the Component will work on that domain forever — without any further costs or payments. This plan is for:

  • Anyone who doesn't want to manage a subscription for the website they are building.
  • Freelancers or agencies who are building websites for client projects. You may not want ongoing payments after a website is delivered. Pay once for the Component, lock it into the domain, and forget about ongoing costs.

Can I cancel my subscription at any time?

Yes, you can cancel your subscription at any time. It's important to understand that all Components created using Finsweet Components will stop working on your production website.

Can I use one subscription for multiple custom domains in my Webflow project?

Yes, the subscription is per Webflow project and is connected to the Webflow project site ID. If you have multiple domains connected to your project, they will all work with a single subscription.

Is there a limit to the number of Component loads on a website?

Monthly/Annual subscription:
Up to 1M views per month. If you want unlimited views, buy a Project Lifetime plan.

Project Lifetime plan:
No, there is no limit to the number of loads on a website with the Project Lifetime plan. Both staging and custom domains have unlimited loads per month.

Is there a limit to the number of Components per project?

No, there is no limit to the number of Components you can use in a Webflow project. As long as you have a subscription or Project Lifetime plan for the Components, you can use as many Components as you want.

How can I instruct my client to get a subscription for their project?

In your client's project, go to the Finsweet Components app and click on the 'Get a subscription' button to be redirected to the checkout. Share this link with your client to complete the checkout process.

What happens if my subscription expires?

If your subscription expires, the Components used on your website will stop working. They will resume working when you reactivate your subscription. We will reach out to you many times before 'turning off' Finsweet Components in your project. We will not show a broken Component on your project. Instead, we will completely remove the entire Component from the page.

Do I need a paid plan to use the Finsweet Components app?

No, the Finsweet Components app is free to access and use. You do not need a paid plan to generate beautiful sliders in Webflow and publish them to your staging webflow.io domain, for example. However, you will need a paid plan if you want to publish Components on your custom domain.

How do the plans work?

Finsweet Components are free to use on staging .webflow.io URLs. If you want to use the Components on your custom domain, an active plan is required. Subscriptions and Project Lifetime plans are per project, and each project that uses Finsweet Components in production requires an active plan.