Folders
Finsweet introduces a folder system add-on for Client-First. Organize our project's classes with Folders.
Intro to Folders
Folders are a virtual organization tool to group and visually manage classes inside our Webflow project.
We can visualize a folder structure for our project's classes inside Webflow Designer by following a simple naming convention. By using the underscore character, we can create a virtual folder system with Client-First.
There are two types of folders: Custom class folders and Utility class folders.
1. Custom class folders
Use the underscore character to create folders for a project's classes.
Finsweet Extension automatically generates a virtual folder structure inside Designer with this new naming convention.
Folders work like this:

A custom class is a class created for a specific component, page, grouping of elements, or single element. For example, a class to style the team slider or a class to style the global headers for the project.
Custom classes use an underscore in the class name.
Here's an example of a Webflow project's classes organized by folder. Selected is the nav_primary_logo-wrapper class.
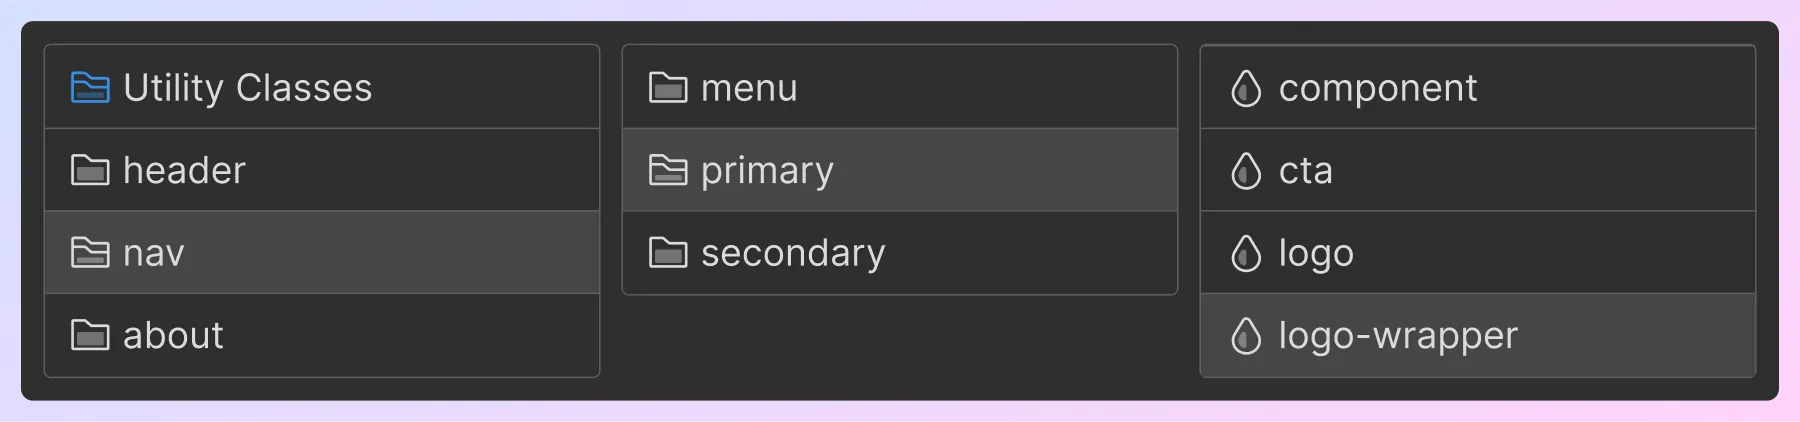
In the example above, we have a first level nav_ folder.
Nested inside is a primary_ folder.
Nested inside is the element name, the logo-wrapper.
The full class name to create this folder structure would be nav_primary_logo-wrapper.
The underscore folder system is specific to custom classes.
2. Utility class folders
Utility classes in Client-First are automatically organized inside the Utility folder.
Utility class folders work like this:
A utility class is a class created with a specific combination of CSS properties that can be applied to elements across the project. For example, a class for background-color or a class for font-size.
Utility classes do not use an underscore in the class name.
Utility classes do not have the same rules as the custom class underscore folder system.
Any class without an underscore goes into the "Utility" folder.
Classes with the dash character only are utility classes.
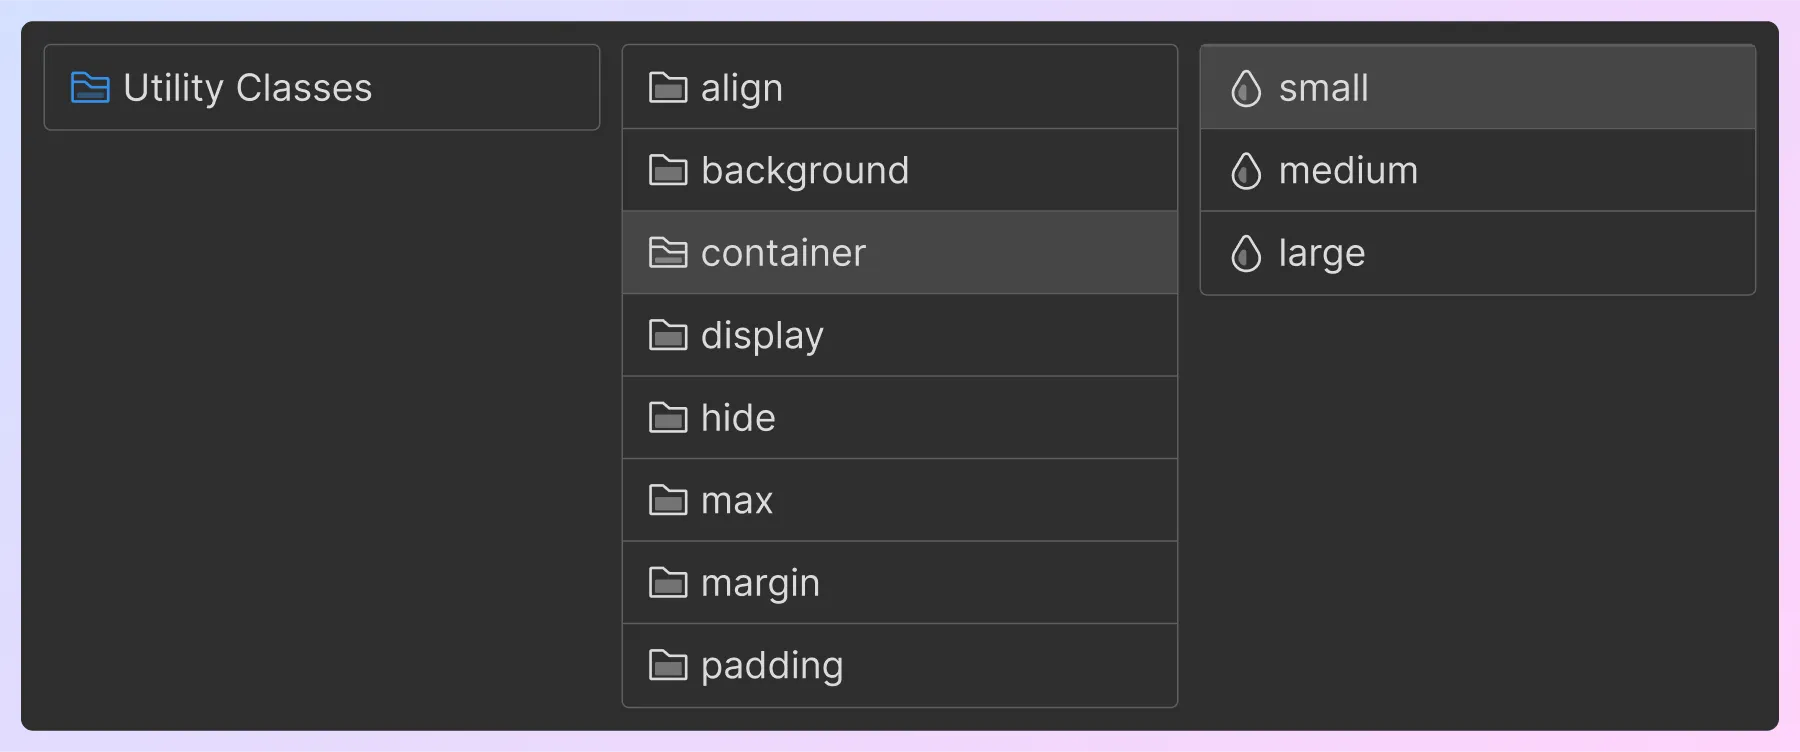
Client-First Folders will automatically group classes in a folder by matching keywords. Below is a screenshot of the Client-First starter project. The classes are organized by keyword.
Custom class folders
Folder underscores
Custom class folders are indicated by an underscore in the class name.
folder-one_element-name

Imagine folders in Client-First like folders on our computer. We give a name to the folder and put items inside. The underscore character is our ultimate folder creation tool for custom classes.
folder-one_folder-two_element-name

In our Webflow project, we can use folders in the same way we use our computer's folders. Folders can have items in them, and folders can be nested in other folders.
Folders help us group, search for, and access elements in our project.
A folder can organize a:
- Tiny group of elements on the page
- Small part of a section
- Section
- Group of sections
- Page
- Group of pages
- Recurring element
- "New" part of the website
How to group elements
The approach we take to group our elements depends on the project requirements. The specs, the size, and many other factors can influence how we organize our folder structure for that project. Each project is different and should be organized differently.
How many pages are in the project?
Is the design and layout for each page unique?
Are there recurring elements?
The answers to these questions can significantly influence how we organize our project's folders.
Projects are unique like our computers are unique.
Each computer has different files and should be organized based on the files on the computer. A computer with 10,000 files would have a different folder organization than a computer with 100 files.
In our Client-First project, the number of folders and levels of the organization should relate to the number of items we need to put in them.
Folders can be nested to achieve maximum flexibility for folder use.
We may want a well-crafted multi-nested folder structure for larger websites with more organization requirements. We may want more simplified single-level folders for smaller, more custom websites.
There is no limit to how many folders we can have in our class name. The organization rules are our choice as the developer.
Nest folders with purpose
Only nest folders if it's meaningful for the project. Don't nest folders just because we can. Many projects can have one folder level without any nested folders.
Over-nesting or nesting with no purpose can make our project challenging to manage.
In our computer files example, having too many folders for a small number of items makes the navigation of our items more difficult. Searching through nested folders can be frustrating if nesting is not needed.
The same concept applies to folders in Client-First. We want to be able to find elements quickly, not search through nests of folders.
Creating folders
One underscore equals one folder
Below we show class names and how those class names translate to folders. We can see the "home-testimonials", "header", and "careers" folders.
Creating one folder
home-testimonials_wrapper
home-testimonials_headshot
home-testimonials_text-small
header-top_content
header-top_image
header-top_accent-left
careers_custom-padding
careers_title-animation
careers_scroll-trigger
Generated folders

The folder's name is generated based on the keyword(s) that comes before the _ character.
Creating a nested folder
We create a nested folder by adding a second underscore.
Two underscores equal two folders
Let's continue with the example above. We will convert each class above to a nested folder. Each class now has two underscores.
Example of nested second folder level
home_testimonials_wrapper
home_testimonials_headshot
home_testimonials_text-small
home_header-top_content
home_header-top_image
home_header-top_accent-left
home_careers_custom-padding
home_careers_title-animation
home_careers_scroll-trigger

By adding a second underscore, we are nesting a folder.
Custom class folders can be named, nested, and organized. There are no limits or restrictions for folder organization.
Utility class folders
Utility classes are created by not using an underscore in the class name. A utility class has dashes only.
firstkeyword-secondkeyword-identifier
Example utility classes
text-color-primary
text-color-secondary
text-color-brand
text-size-small
text-size-medium
text-size-large
padding-top
padding-large
page-wrapper
page-padding

Creating utility folders
A folder is created with matching keywords in the class name. Utility folders can create as many levels of nested folders as possible.
Matching keywords by index
The word index in this context means "The position/order of a keyword in a text string".
Finsweet Extension looks for matching keywords by index (position) and organizes classes inside the Utility folder. We will look at an example of keywords by index using text-color-primary.
firstword-secondword-thirdword = text-color-primary
In the above example,
- text = firstword
- color = secondword
- primary = thirdword
We always create a folder from firstword. The "text" folder will be created regardless of other class namings in the project.

If at least one other class shares both "text" as the firstword and "color" as the secondword, create a folder called "color" inside "text".
When we find two classes in the project that start with text-color-, we create the "color" folder.

We can add any amount of classes inside the color folder by continuing with our text-color- naming convention.

No matching keywords at secondword
If there is no matching keyword as the secondword, a class will remain in its parent folder. We will understand this through an example.
If we have a class text-indent-large and no other class in the project that starts with text-indent-, this class will be placed in the "text" folder.

An "indent" folder is not created because there is only one class with "text" at firstword and "indent" at secondword. There are no other "indent" classes.
Once we add a matching class, for example, text-indent-small, a new folder will be created.

No matching keywords at firstword
Above we explained, "We always create the first folder from firstword". We will always create the first folder based on the firstword, regardless of other class names in the project.
If a class has a unique firstword, and this firstword doesn't exist anywhere in the project, we create a folder for firstword, and this class is the only class in the folder.
For example, we have a class in our project called filter-blur-extend. If there is no other class in our project with the word "filter" at firstword, we will see a "filter" folder with blur-extended as the identifier of the class name.

Scaling utility folders
Client-First starter project comes with an organized folder system of utility classes. We can add, remove, or edit these classes based on our project.
Adding and removing folders from the Utility folder is recommended for each Webflow project.
We can continue to add or remove nested folders by using matching keywords. Create a match at firstword and secondword to create new utility folders.
For example, a class grouping to style box-shadow:
shadow-box-large
shadow-box-medium
shadow-box-small
shadow-circle-large
shadow-circle-medium
shadow-circle-small
shadow-blur-x
shadow-blur-y
With these classes, we have just created a shadow folder with three nested folders inside — box, circle, and blur.

Folders decision making tree
There are many decisions to be made when organizing our project's classes.
Some decisions should be made before we start developing. Many decisions can be made as we are developing.
It may be time-consuming when we start making organizational decisions in our Webflow project. Making fast and intelligent decisions come with practice.
Understand that making decisions for folder names is something we will improve on as we continue using Client-First. Our speed and accuracy will improve as we continue to use the Folders feature in our projects.
Visualization of decisions
We have developed a decision making tree to help us understand how to make quick decisions about class organization.
View a PDF of our Folders decision making tree. This model shows the thought process of giving a name to a folder.
Questions asked in the decision making tree are below:
Is this class used to create a specific CSS style that can be used on any element? For example, text-size-large.
Use Utility Class folders. It's best practice to continue with the utility classes that come with the Client-First cloneable.
For example: page-, heading-, text-, icon-, etc.
If the utility styling is not included with the Client-First cloneable, create a new utility folder.
For example: shadow-small, shadow-medium, shadow-large
Is the element specific to this page?
It may be a good strategy to add the page name to the class name.
For example:
1. [page]-slider_pane
2. [page] _slider-pane
3. slider_ [page]-pane
Is this element part of a specific component? For example, a clients slider.
It may be a good strategy to use the specific keyword in the class name.
For example:
1. slider-clients_pane
2. slider _clients-pane
Is this element part of a general component that can be used anywhere in the project? For example, a slider that can be used for multiple content use cases.
It may be a good strategy to keep the folder name general.
For example:
1. slider_pane
Workflow enhancements
Folder rename (Bulk class rename)
Rename every class inside a folder in one bulk process.
For example, if we rename the testimonials_ folder to clients_, we will rename every class inside the folder with the update.

This is an opportunity to organize our project at any stage of development. We can change the naming convention of hundreds of classes within minutes.
Using Relume Library, we can copy template-named components to our project and bulk rename them for our use case.
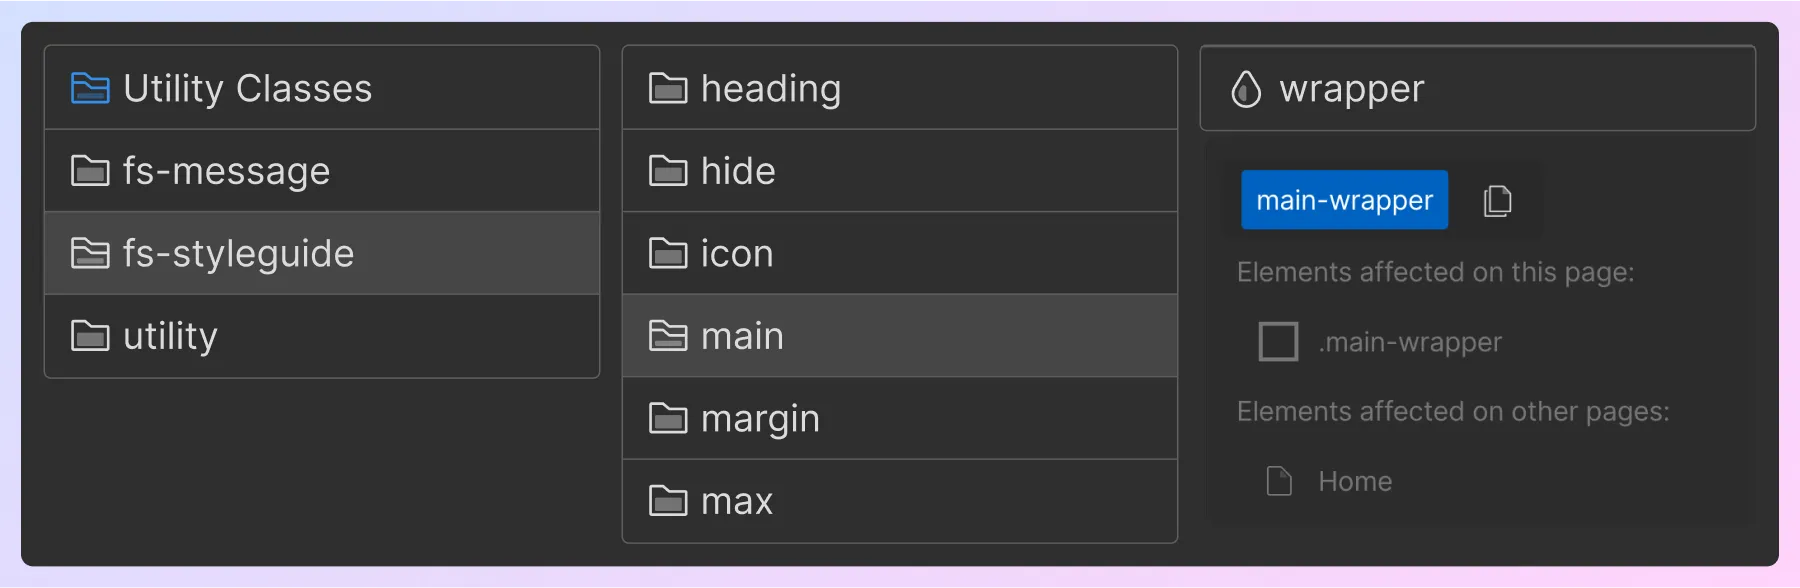
Class/Folder data and page influence
Open class the details to understand how this folder or class is affected in the build.
We have the same information that is shown natively inside Webflow Designer's Style Manager panel.
View "Elements affected on this page" and "Elements affected on other pages".

Access this information at the folder level or at the element identifier level.
This feature gives us a deeper look into our project's folders and how they are used throughout the project.
Copy class name to clipboard
Copy-to-clipboard the name of any class.
We can copy any part of the class name based on where we open the class details.
For example, we can copy the folder name by accessing the class information from the folder level.
We can copy the entire class name by accessing the class information from the element identifier level.