Typography strategy
Build and maintain a unified typography style system across the project.
HTML tags are default
Typography should be our project's most simple and organized type of utility system. Websites with unified typography systems help us to be clear to the user.
We can think of HTML typography tags as our default typography values.

In a perfect world, we would never have to put a class on a Heading or Text Element. Following the default typography in all instances would result in a clean and organized project.
However, it’s common for brand designs to have variations and customizations for different instances of text.
We use a class when there is a variation from the default typography style. A class changes the default typography value.
For example, a global utility class such as text-size-medium.
We apply text-size-medium to the Text Element because the size is a variation from the default body font-size.
Utility classes to customize the default
We use global utility typography styles to help unify, organize, and manage these typography variations.
Client-First comes with a global utility class system to get us started with typography organization. We use text- and heading- as prefixes for our typography utility classes.
Benefits of Client-First typography system
1. Global management
Globally manage the important CSS properties that make up the typography variations. We can make global site-wide typography changes by changing one single value.
2. Prevents unnecessary class creation
Prevent duplicate class creation for reused styles. Global utility classes will reduce the number of unique custom typography classes created. For example, text-color-brand.
We want to avoid creating multiple custom classes that manage our text's color: blue.
3. Workflow, speed, and organization
We can search for and manage our typography classes in the Designer Styles panel by typing the prefix text- or heading-. This allows us to use typography classes in our workflow quickly.
This prefix naming convention helps us manage our typography inside the Styles panel search and Folders. We can organize our typography utility classes in a dedicated folder structure.
Typography organization enables us to work faster and more efficiently inside Designer.
Reasons to customize the default typography
Variation in style
The most common reason.
When there is a style variation to the default typography element, we may want to apply a global utility class.
We can use one or more global utility classes to customize the text instance. For example, text-color-primary, text-weight-semibold.
By adding different class combinations to the typography element, we have many options to style our text.
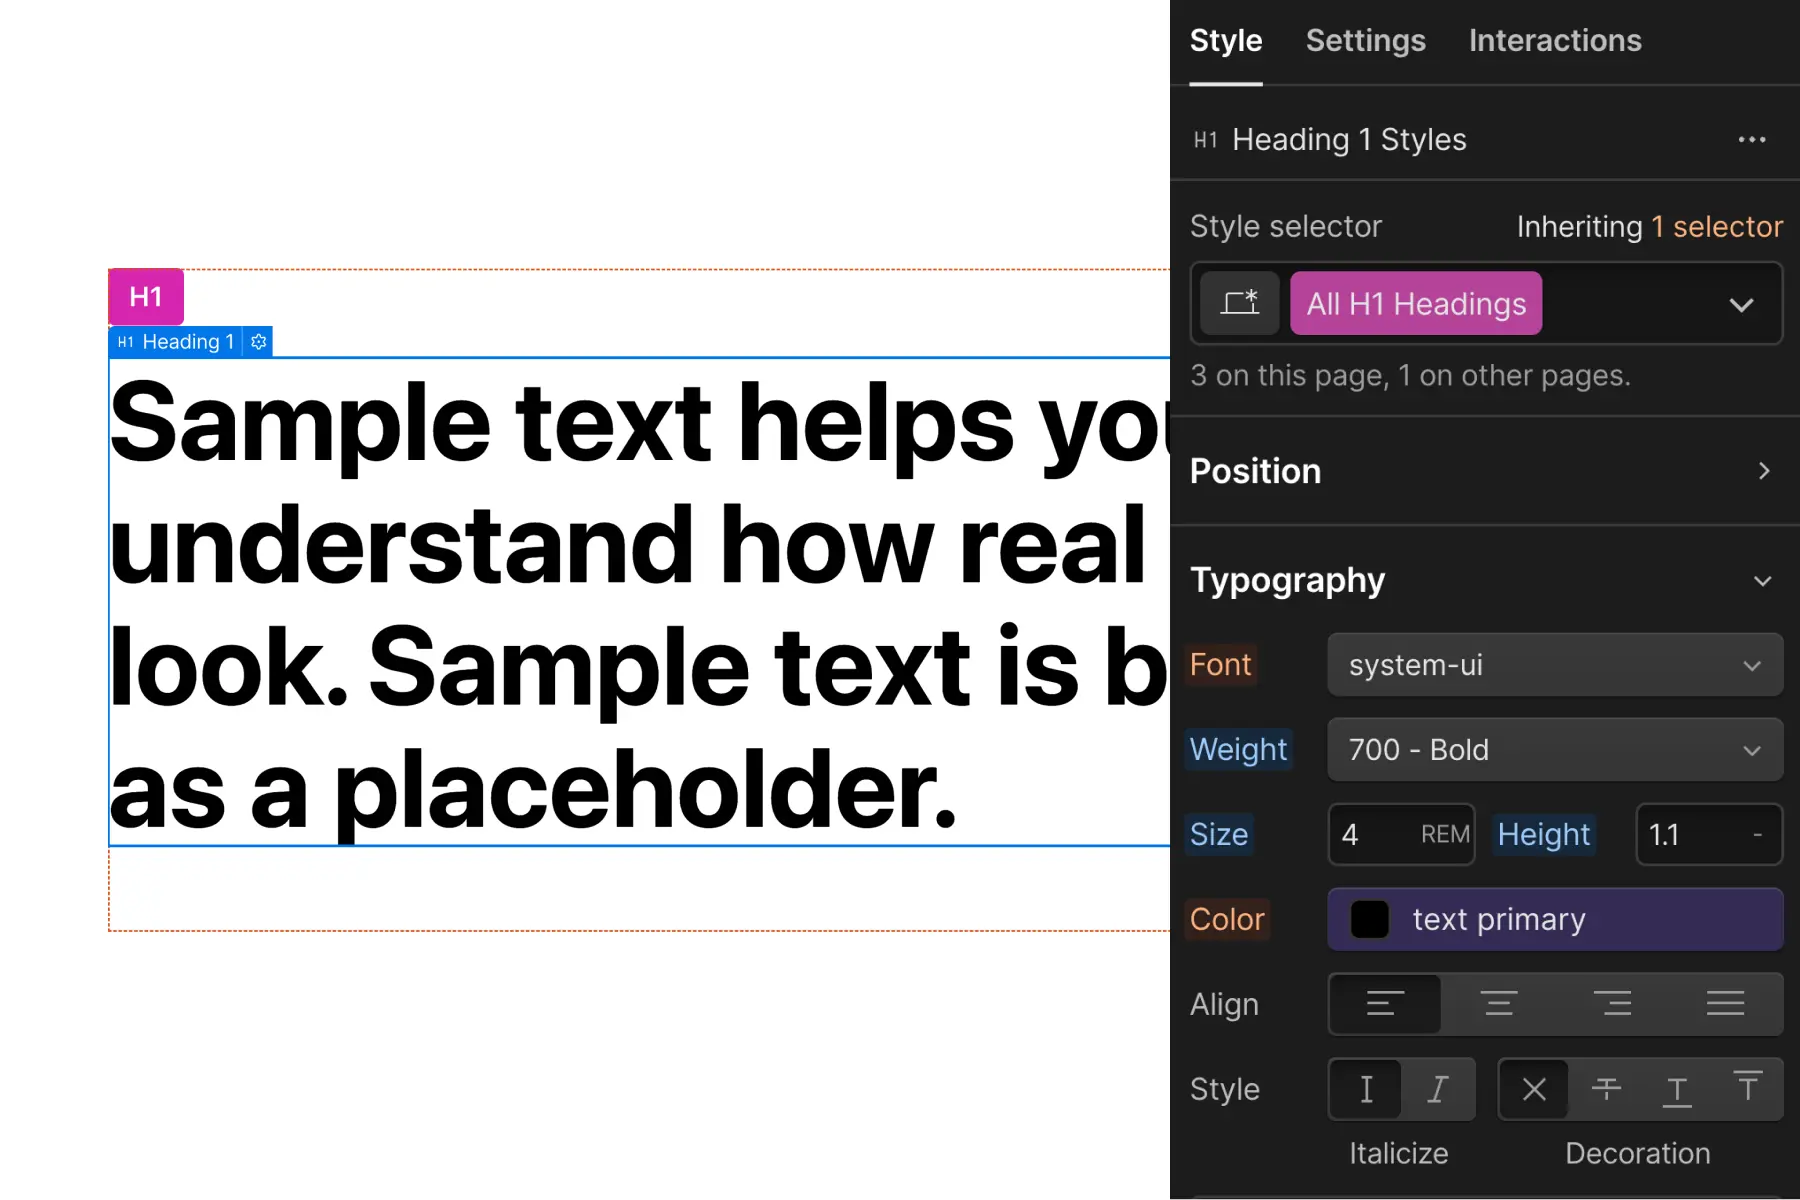
Most of our Headings should be without a class when possible. The more we use the default styles, the more unified our typography is.
Heading tag for SEO does not match Heading tag in design
For example, we need to use an H1 tag for the page's title. The H1 is required for SEO and page crawling. However, the styles of this title should follow the H2 styles of the project.
We have a conflict where the SEO-required Heading tag needs the default styles from a different Heading tag.
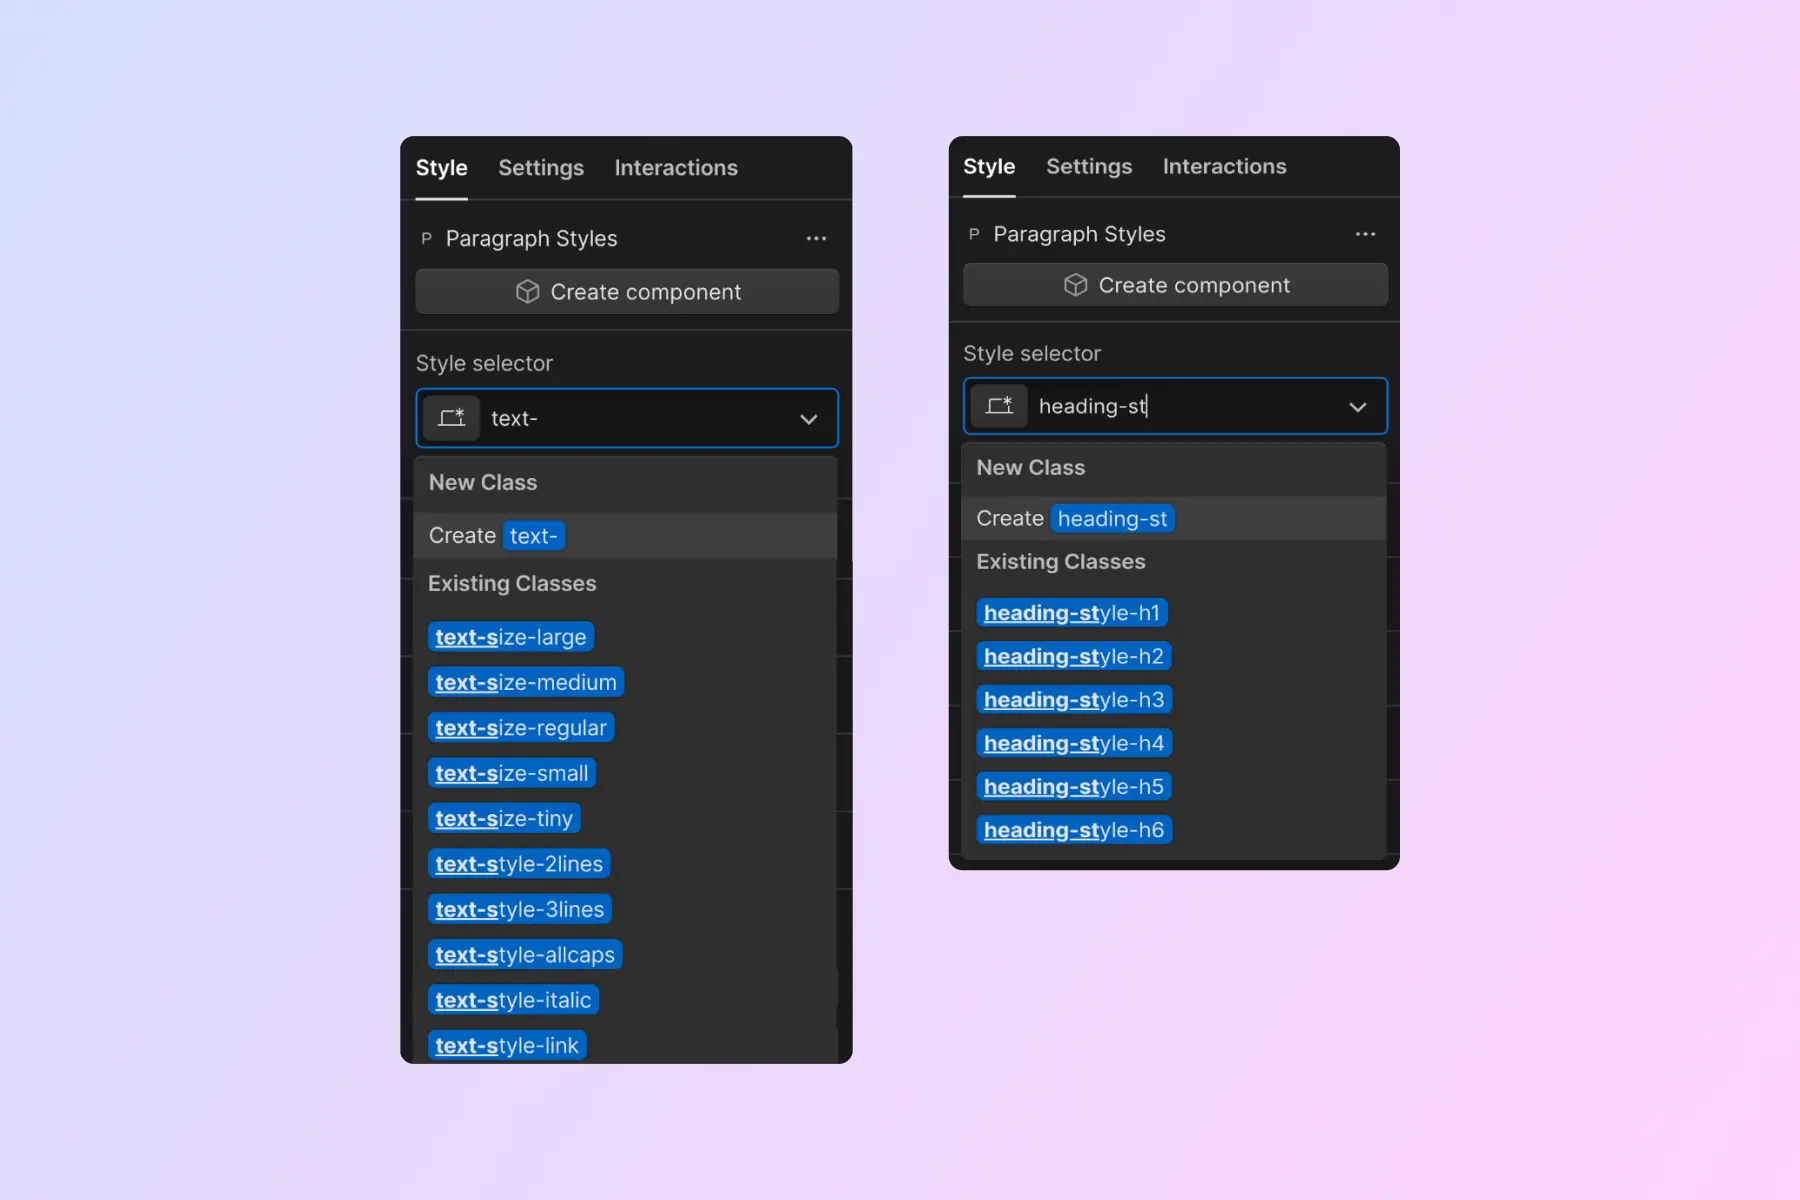
We can apply heading-style-h2 to the H1 element to mimic the H2 style while maintaining the H1 tag for SEO.
heading-style-h# classes are helpful for implementing any Heading style while keeping the SEO-appropriate Heading tag for the text element.
It's crucial to understand that heading-style-h# does not change the HTML Heading tag of the element. It only changes the CSS styles applied to the element.
Applying the heading-style-h# class should not be used for most instances. Most of our Headings should be without a class and follow the default. Our default Heading styles should be more common than Heading variations.
Avoid using a Heading tag
We only want to use Heading tags for Headings. If there is text on the page that is not a Heading, but needs Heading styles, do not force a Heading tag on the element.
We want to keep our H1 - H6 organized and used correctly for SEO.
In this example, the monthly pricing is featured. We do not want to use the Heading tag for this use case because it is not a Heading with relevant content. However, we need the styles from H2.
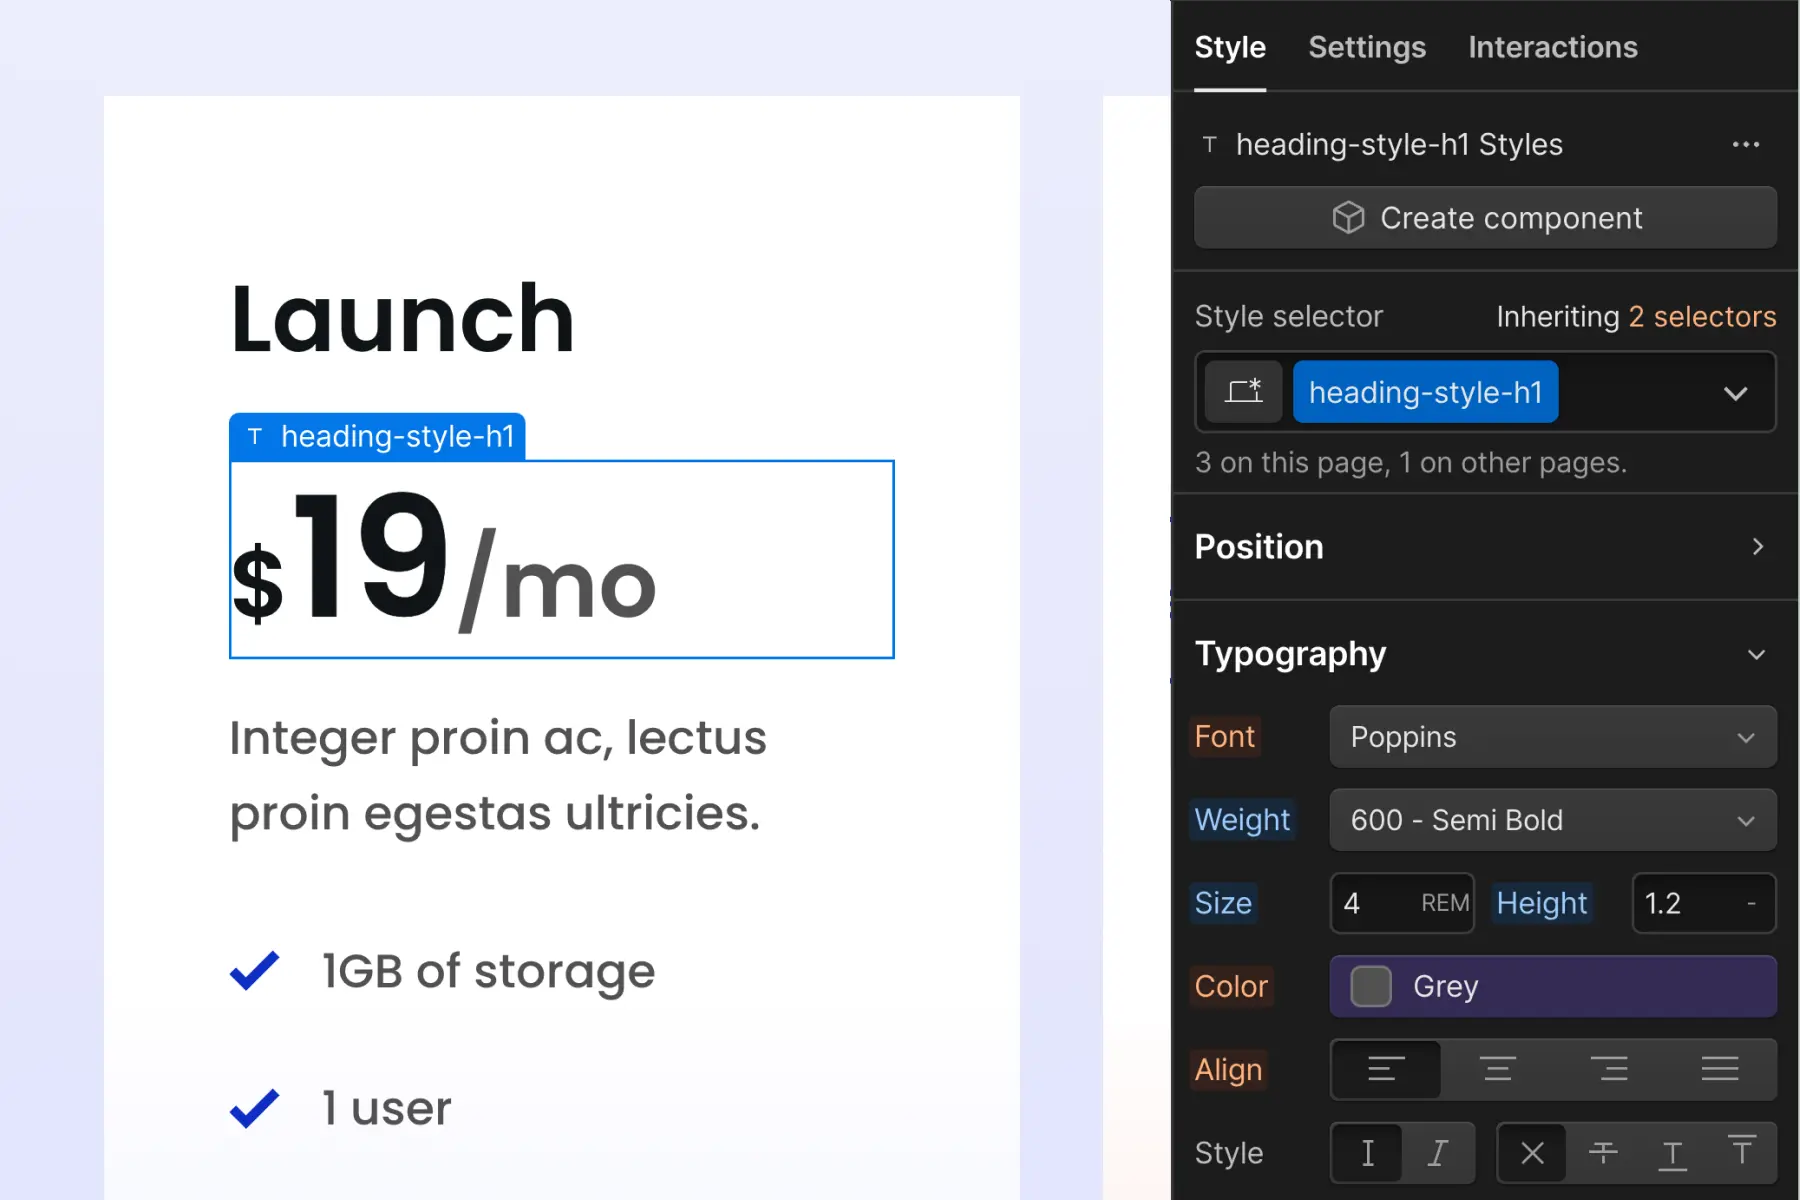
Instead of using a Heading tag for non-Heading elements, we can use a Text Element and a custom class to style it.
Customizing the typography system
The official Client-First starter project gives us a good starting point. It is not your final set of typography styles for the project.
With each new project, we should update the style guide page based on the styles of the project.
Create a new utility class system
After we update all of the typography classes that come with Client-First, we should consider adding new typography classes to the project.
We can create new typography systems inside the utility class model.
For example, if we are building a site with different values of opacity throughout the project. We can create a utility folder for typography opacity.
text-opacity-low
text-opacity-medium
text-opacity-high
text-opacity-full
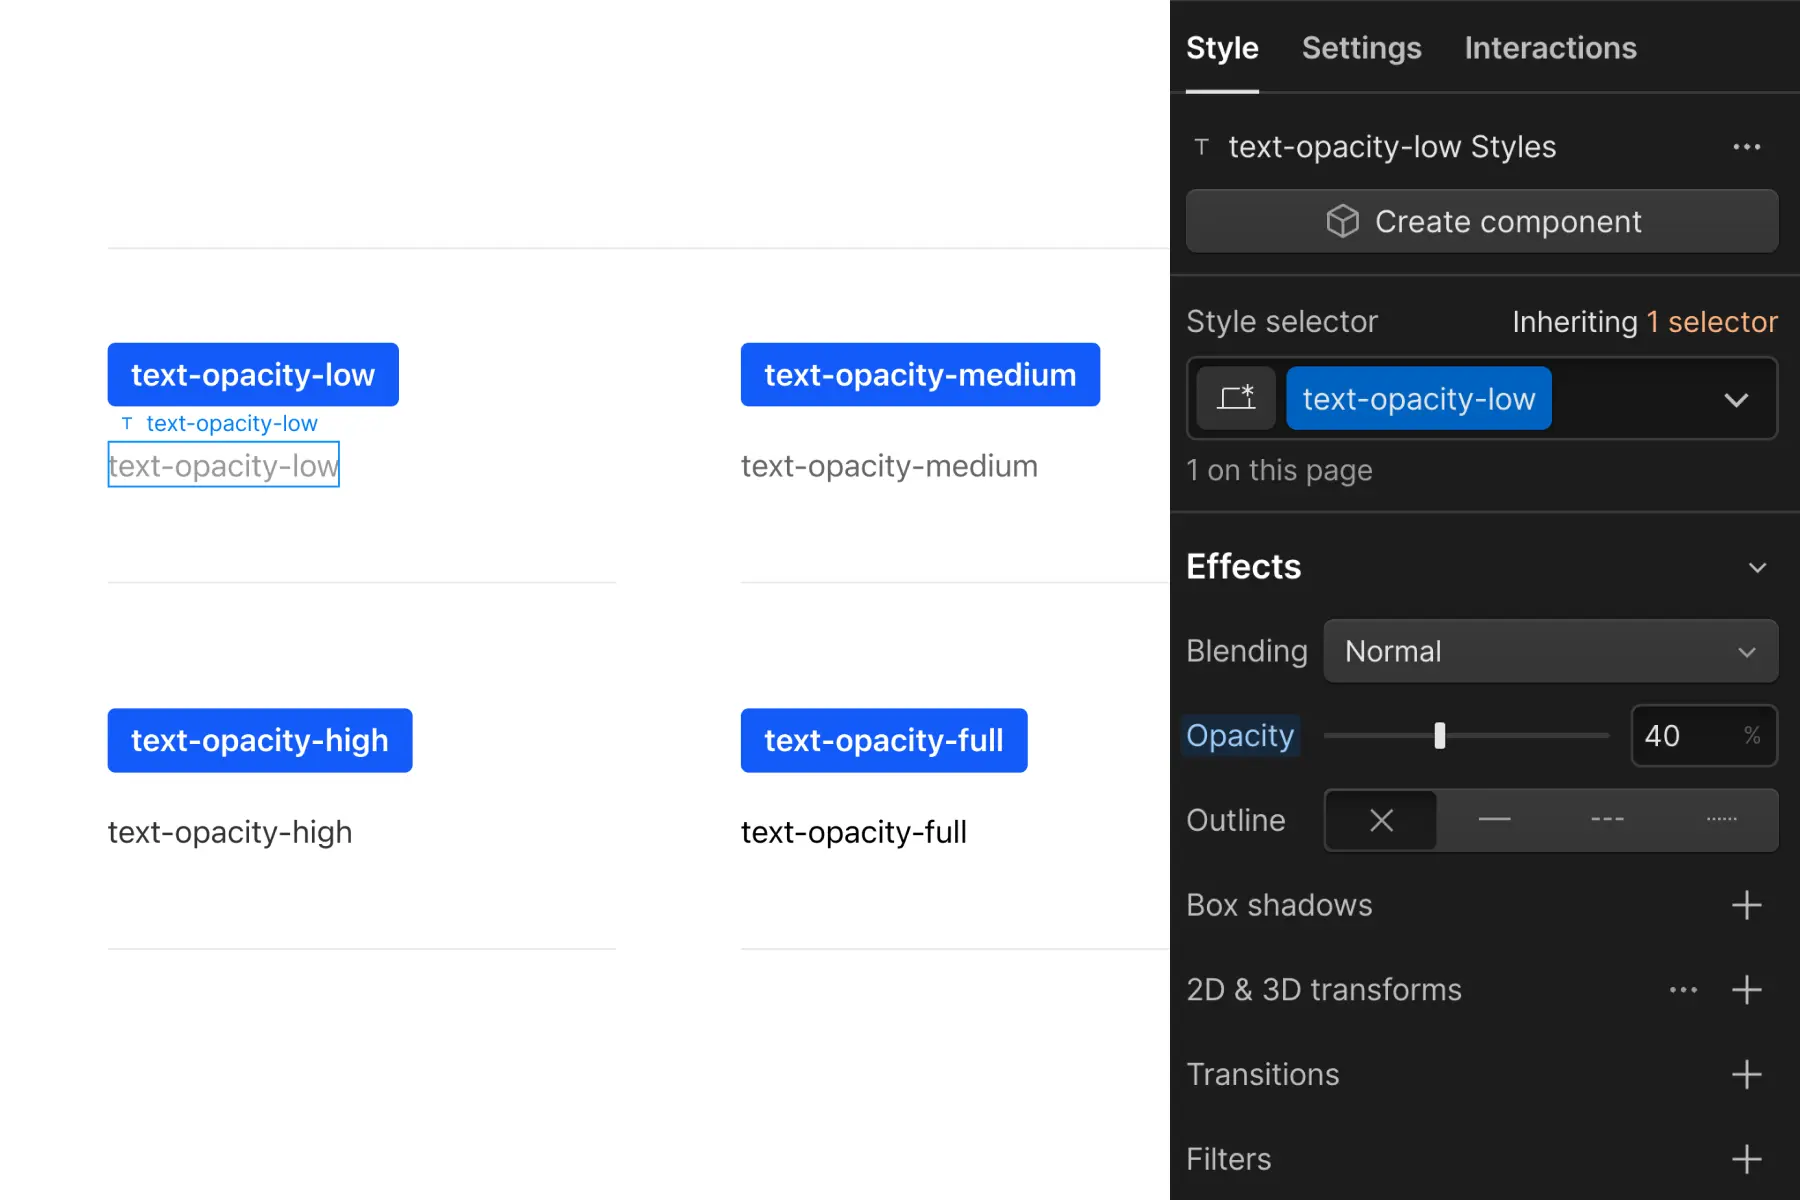
Creating these classes would be represented like this inside Folders:
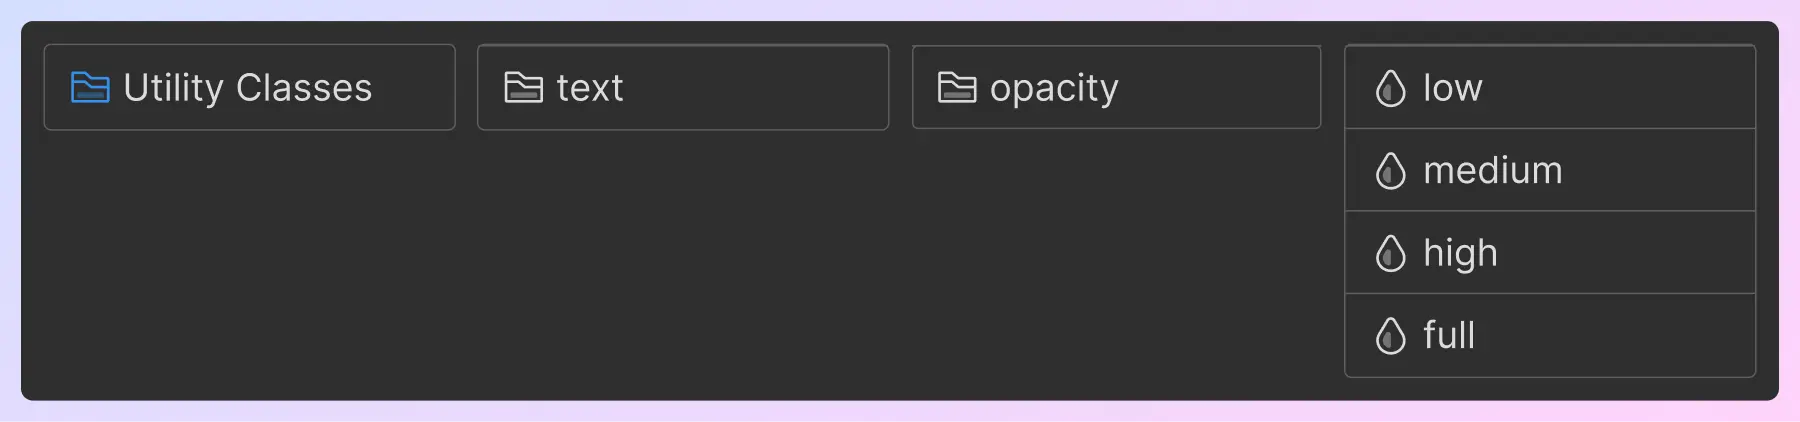
We can create new folders inside the Utility Classes folder for any CSS property we want to manage globally.
Create a new utility class to avoid deep stacking
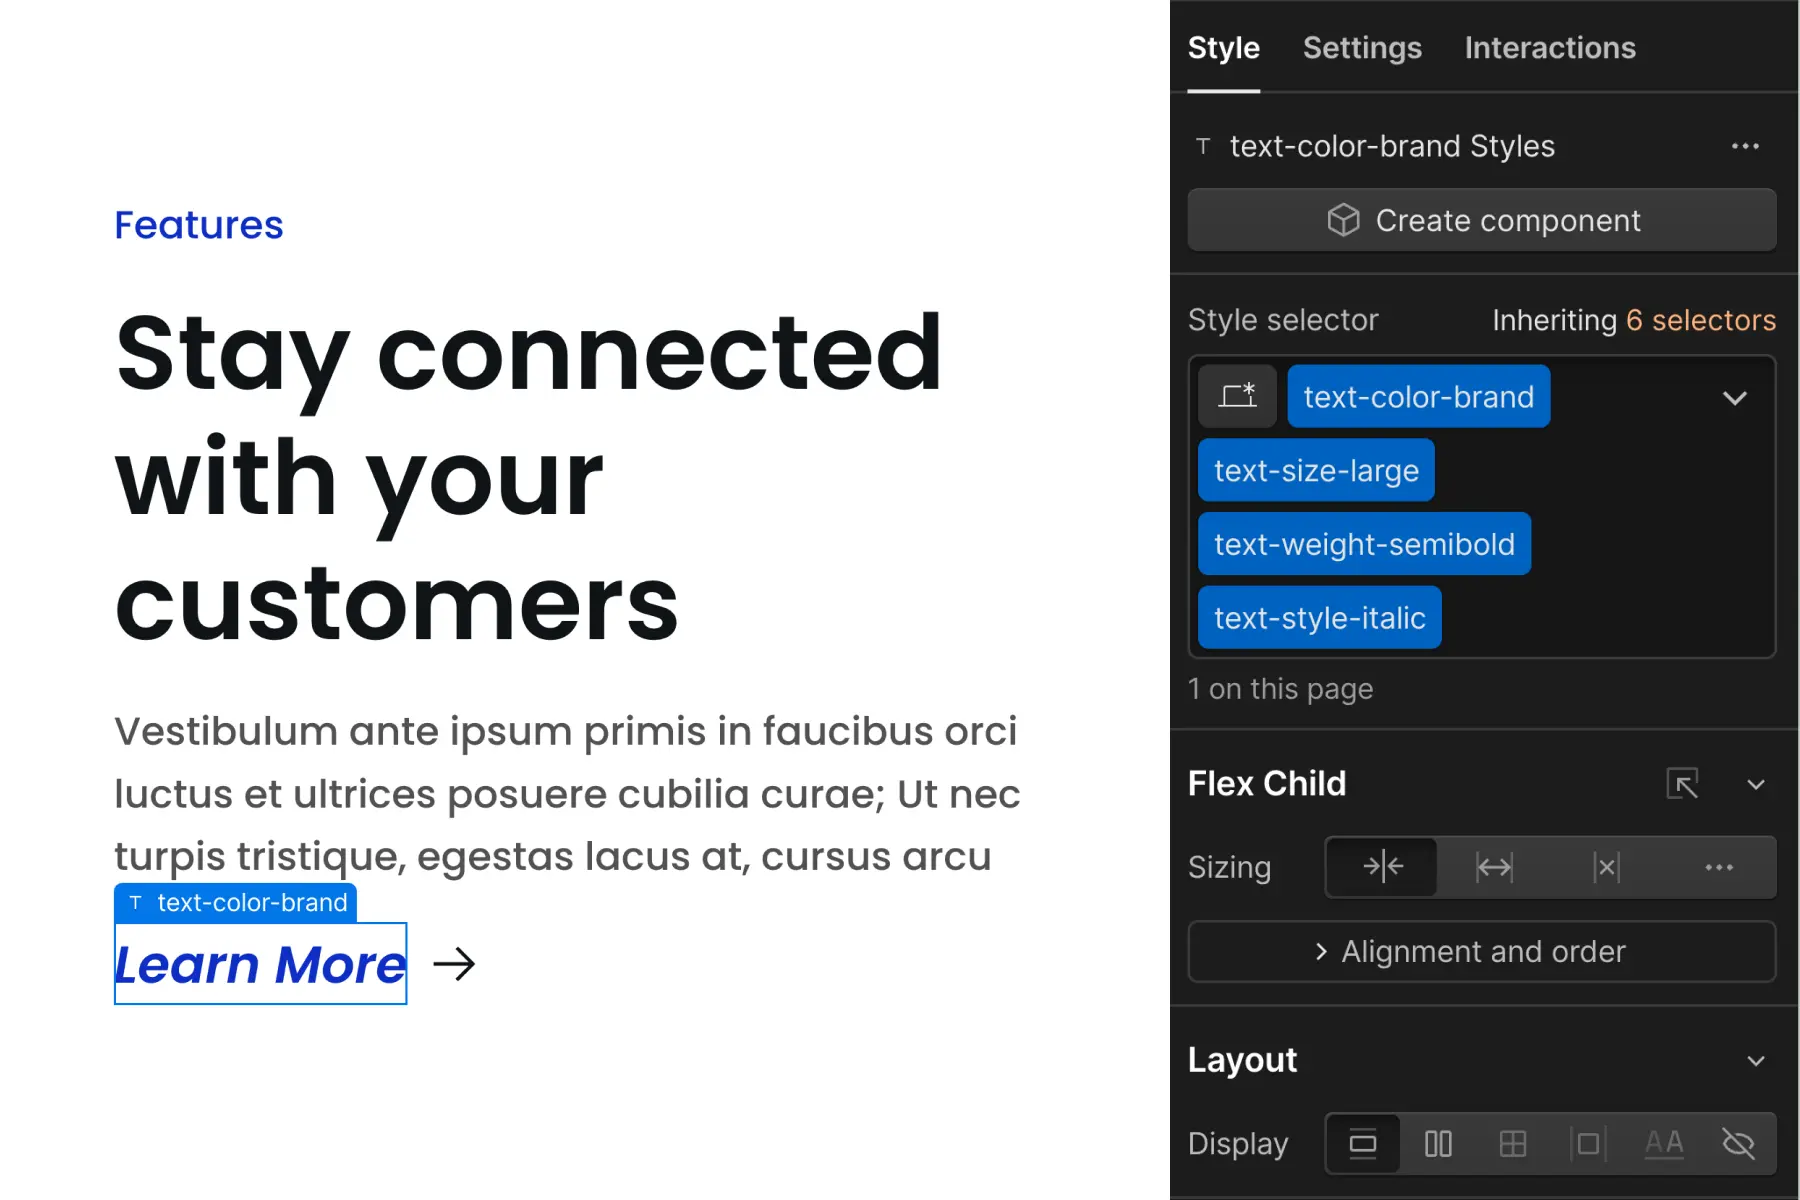
In Client-First we always want to avoid deep stacking classes. We can deep stack global utility classes to get the exact text customization we need.
There is a complete explanation of deep stacking in Classes strategy 2.
When deep stacking typography classes, we will have difficulty changing earlier classes in the list of stacked classes.
If this combination of stacked classes is recurring in our project, we can consider creating a new utility class that represents the stacked class group.
For example, we can take our example above and combine all styles to text-style-subtitle — or text-style-alternative — or any other name to describe the use of the combined styles.
We can use this class each time this deep stacking use case occurs.
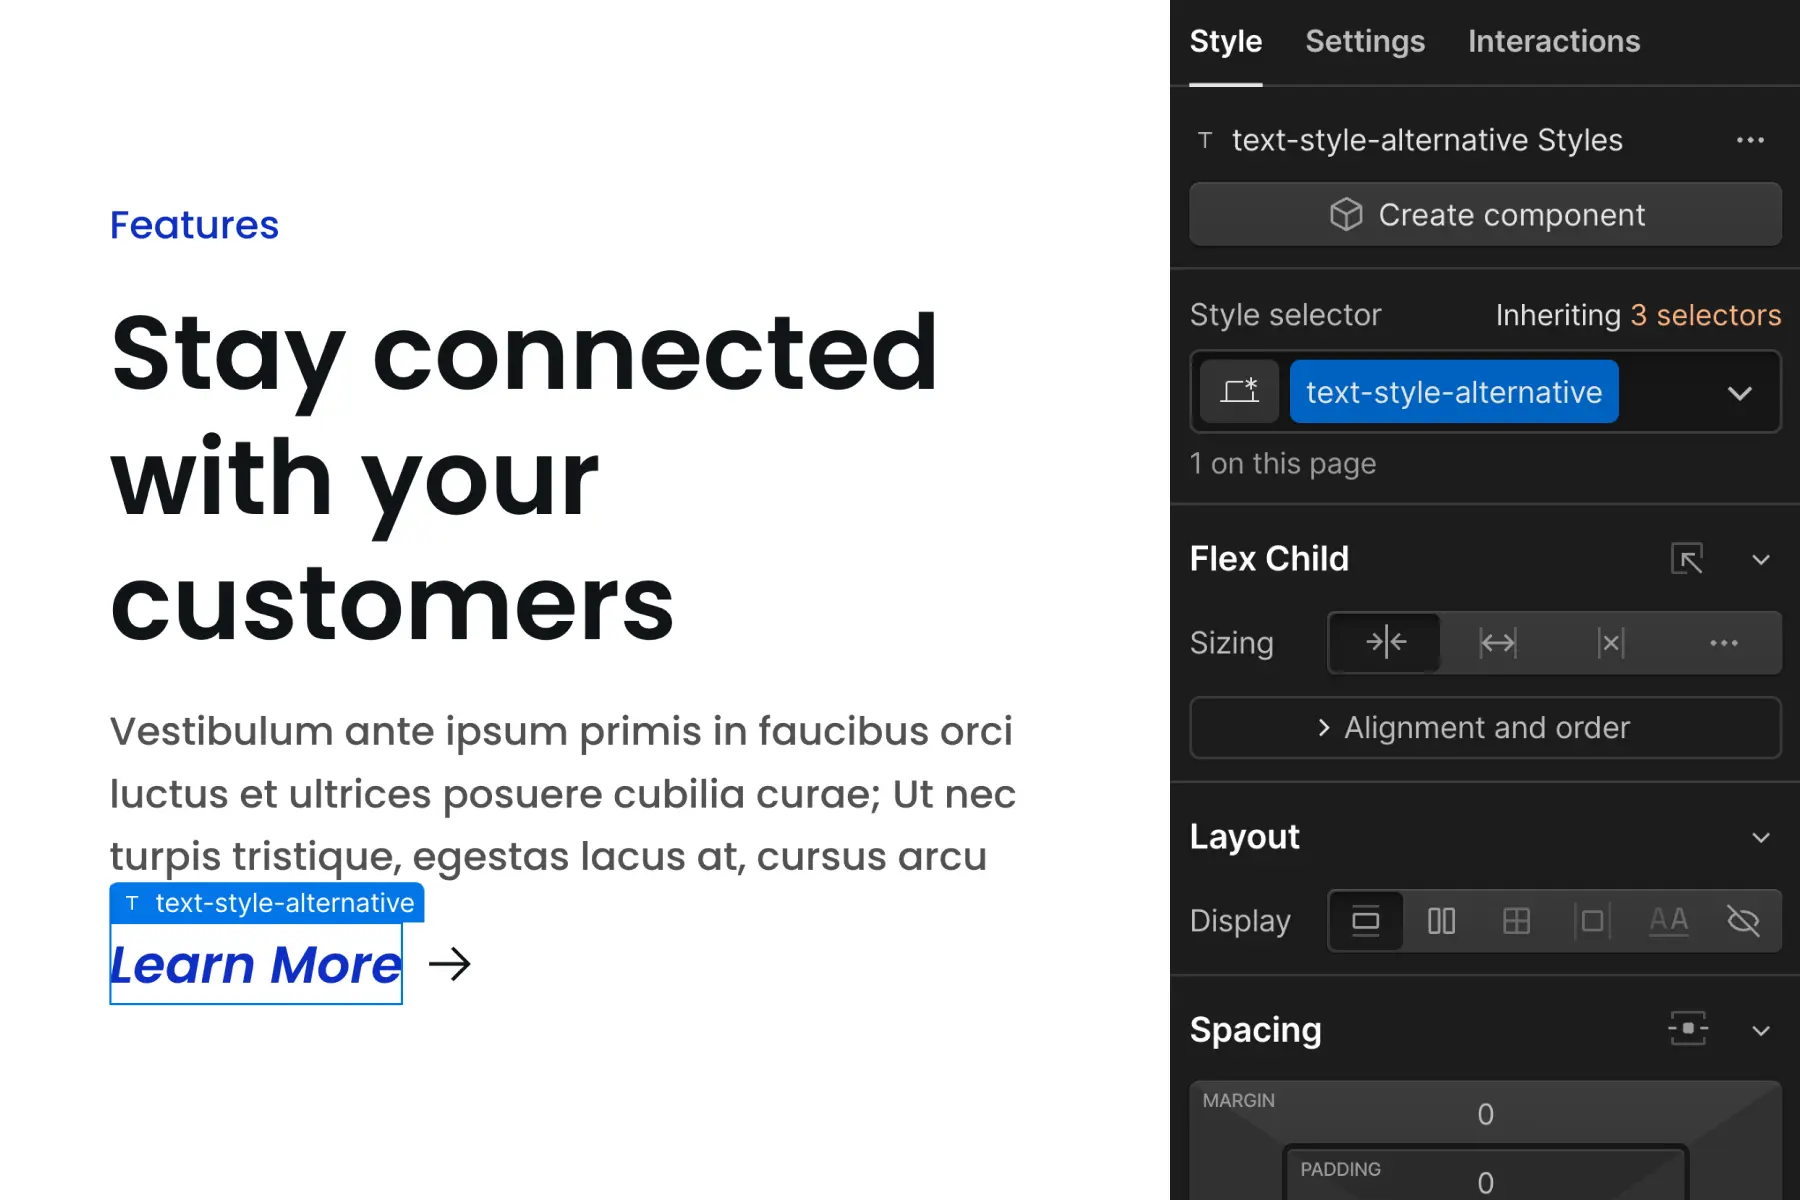
The folder name inside the text folder is our decision.
We can use the 'style' folder to hold these grouped styles — text-style-alternative.
We can also create a new folder —text-custom-alternative.

Understand that the more we use this strategy, the less global our typography system becomes. We will have to take additional steps to change key global style properties.
For example, if the properties of text-size-large was used to create text-style-subtitle, and we want to update all text-size-large from 3rem to 4rem, we would need to make this change twice — Once to text-size-large and once to text-style-alternative.
We no longer inherit text-size-large when we grouped our stacked classes to create text-style-alternative.
We lose a lean global typography system if we abuse this grouped styles strategy. However, when used intelligently, it can help us work faster. Always make meaningful decisions when creating new utility classes of grouped styles strategy.
Create a custom class
The utility class system will not work for every use case.
Reasons a custom class may be better for text:
- Unique and specific text
- Manage a particular grouping of text
- Customize responsive default
"Create a custom class" should not be a common practice for the project. Ideally, most of our classes fall into the utility typography system.
However, sometimes a custom class is best. Below we identify three use cases where a custom class may be ideal.
Unique and specific text
When we have unique text that does not fall into our utility system, we can create a custom class to apply the exact styles required for the text.
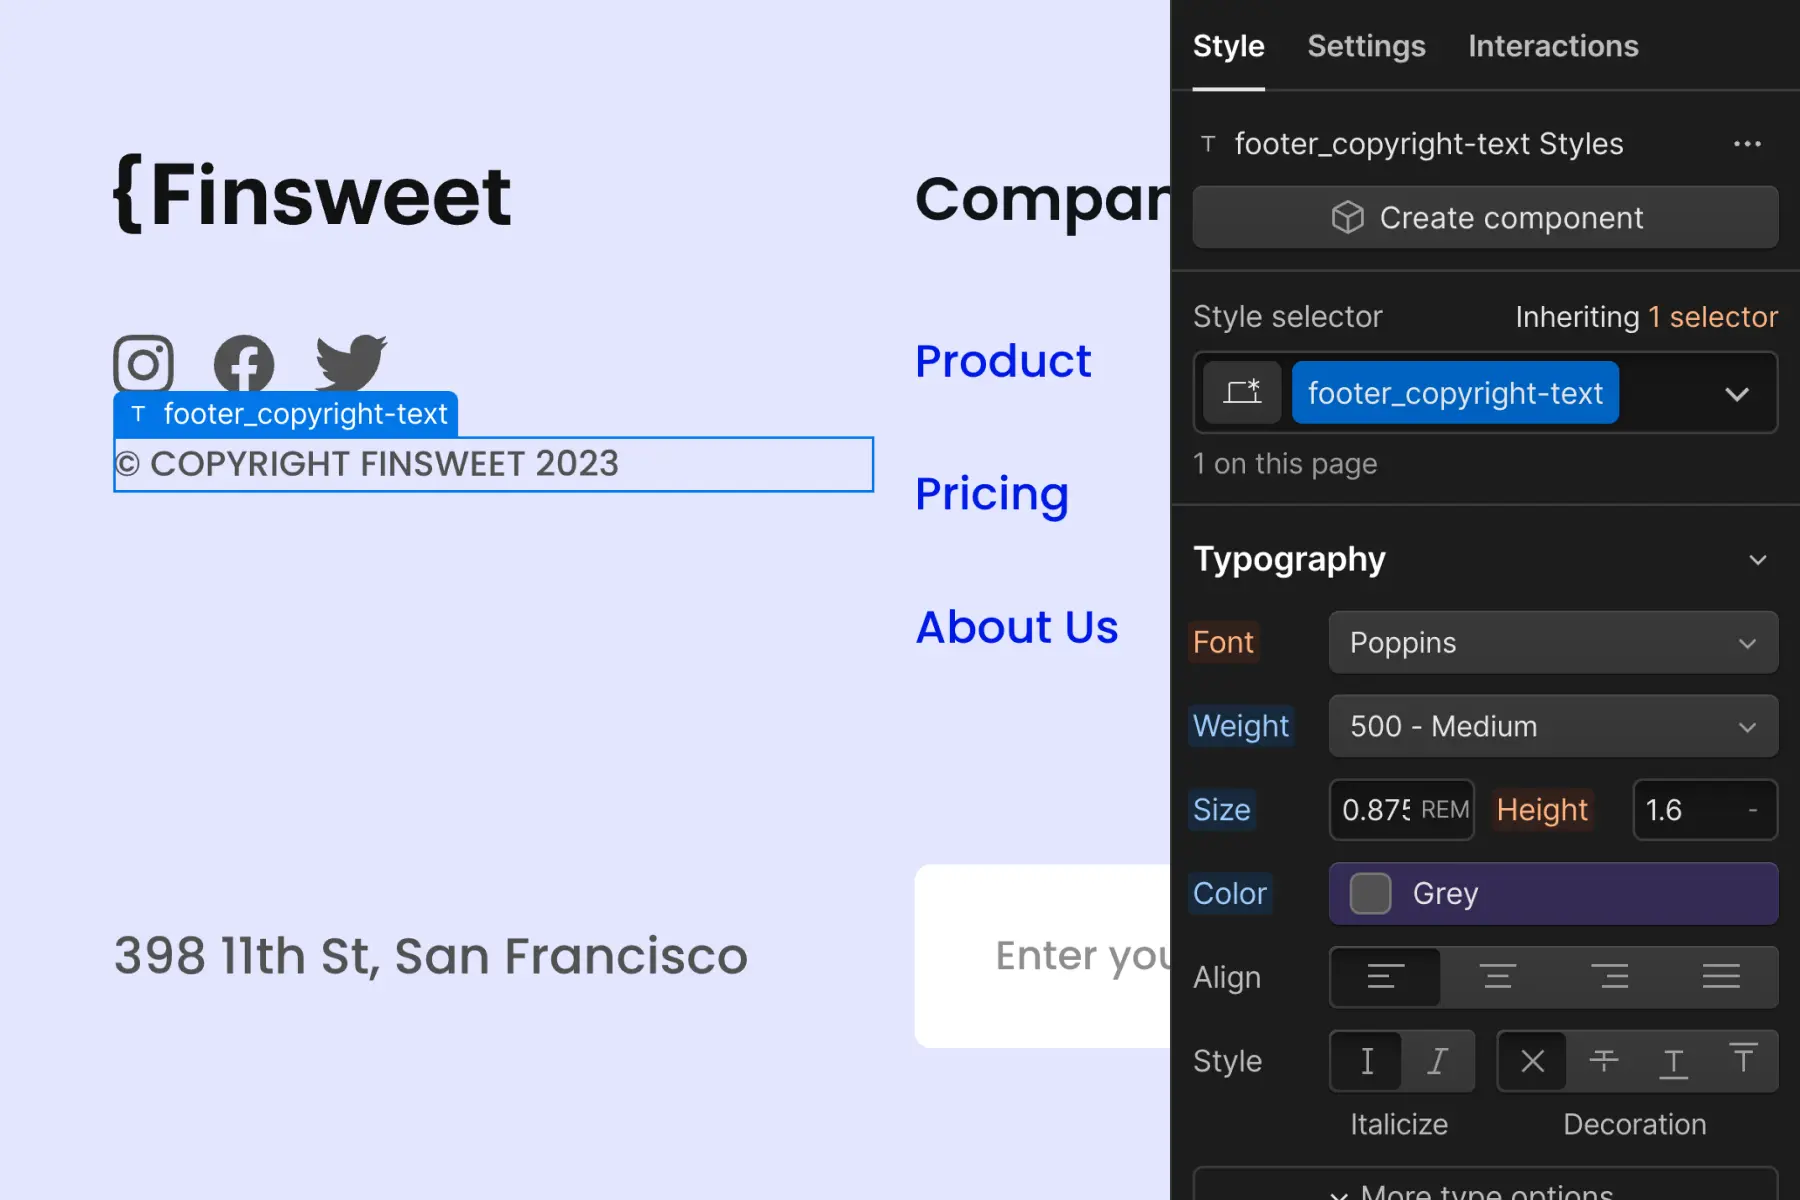
For example, footer_copyright-text. The copyright text is very small, has a special grey color, is all-caps, and has different stylings across breakpoints. It's a specific identifiable text element with a unique combination of styles.
Creating this combination of styles may be possible to style with utility classes with 4-5 stacked classes. We never want to force a text element into the utility class system.
It's quick and easy to use a custom class for this specific instance.
Manage a particular grouping of text
With one style change, we can update all instances of the special grouping of text.
Footer link Example
For example, footer_link. The footer link is seen [8] times in the footer of the project. Applying this one class to each of the footer links allows us to manage the group of text together.
Adjusting the size of the footer_link text can be made to one item, and all footer_link items will change with it.
The ability to update all instances is beneficial for text with a high likelihood of responsive customizations.
Customize responsive default
Our utility typography system is ideal for maintaining default typography across all breakpoints.
If text does not follow the default across all breakpoints, a custom class may help us achieve this customization.
For example, the H1 on the page follows normal H1 styles on desktop and tablet. On mobile, the H1 text reduces size significantly. The H1 is a long string of text and the size must be adjusted for mobile. We can use a custom class to achieve this customization on lower breakpoints. For example, faq-template_heading-text.